|
|
||||||||||||
|
Formula one |
|
|||||||||||
|
Building the Tamiya Williams FW14B or The Return of the Prodigal Modeller Part I |
||||||||||||
|
by Dan Parratt |
||||||||||||
|
In the Beginning…. About 18 months ago, I happened to make a very rare excursion into the loft (probably on a mission to "find" some obscure artefact which my wife had put somewhere in a dusty box for safe keeping). During the dig, I found a rather scruffy box which on opening, gave me a rather curious shot of acute nostalgia and extreme embarrassment. Inside the box was a Tamiya 1/12th Tyrrell P34 (built), McLaren M23 (partially destroyed), and a Lotus 49 (totally destroyed). These definitely qualified for the term "artefact" in that they date from dim, distant points in my youth (approximately 1977), and the standard of construction is of course commensurate with good old Britfix tube cement, and no money for paints. Holy insult, Batman! I know, we've all been there…. Editor note: The author wrote this article few years ago Anyway, I began thinking, I wonder how much have these kits come on over the years, so I made
a quick trip to my local model shop, and had a root around in some boxes. I should point out at this stage, that for the past few years, I have been heavily into sci-fi kits and figures, and to be quite honest, I felt I had reached the end of the road, partly because of the level of quality in this medium, but mainly how do you display your prized collection when your other half won't let you keep Alien
What I didn't know of course at the time, was that out there, just waiting to be found, were a host of aftermarket accessories people, who I'm sure could supply a pack of 1/20th scale Johnny Herbert's lucky underpants if you felt the need for total realism. Anyway, the Leyton House was under serious construction, and going extremely well, until having scoured the country for two cans of Coral Blue, (ask my wife how traumatic it was to see my sad little face when I put down the phone after yet another shop didn't have it in stock, and it could be months…), I fitted the cowl to the chassis, and realised that I had lovingly fitted and filled the cooling scoops the wrong way round. Curse, swear, need another kit and another can of Coral Blue….and that's how I got back into F1 modelling.
For some reason he (that is, my wife) listened …well, actually, my wife didn't buy it for me, as we have a system in our house. For our birthdays, or Christmas, we get "permission" to buy what we want, rather than ask for the thing itself. It seems to work for us - try it, your dream to drive a F1 car may be attainable this way. So having decided to go for what is probably the best 1/12th kit of all as my first stab back in the arena, I also decided to document the saga of the build, so that anyone like myself getting back into it might be encouraged to actually start, rather than get the box out, examine the pieces, get daunted, curse, swear, put it back, and get another 1/20th one going. So here we go… The Williams chronicles Well, starting with the research, I found the best books to be the '92 F1 annuals, obviously Autocourse, and one or two of the foreign translation ones such as F1'92 by Leo Turini ( which incidentally is very useful for all the other '92 cars Tamiya do ). The box art itself is very useful, but only as a guide, as it appears to be a conglomerate of the FW14B, and the earlier non-active suspension FW14 ( check out the position of the alternator, for example).
The other smart thing to do is to crawl all over the car on display in the Donington collection, as there is no substitute for the real thing. The various types of composite used on the car can be very confusing, as sometimes it is painted, sometimes left natural. When painted, it appears to be a very waxy shade of black, best replicated by Halford's Vauxhall Diamond Black, oversprayed lightly over a matt black basecoat from about 12-18".
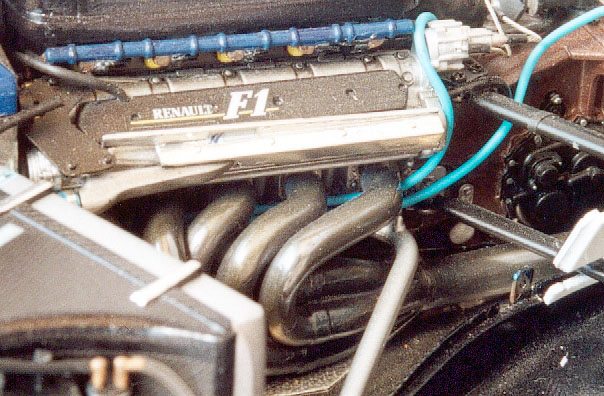
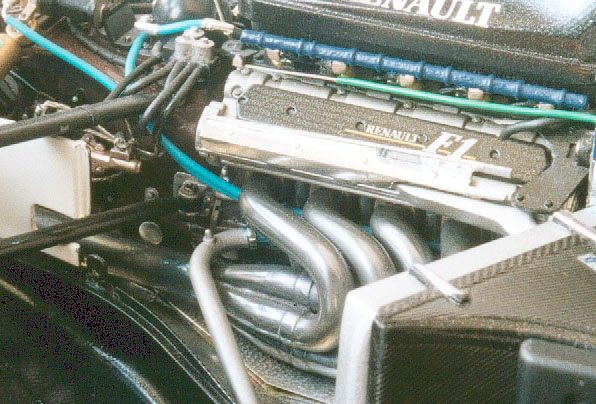
Engine and transmission Construction of the kit starts with the engine and transmission, which is essentially a one piece slide mould. As an engineer I have ultimate admiration for the tooling men here, as the detail, rigidity and sheer clever design is devastating.
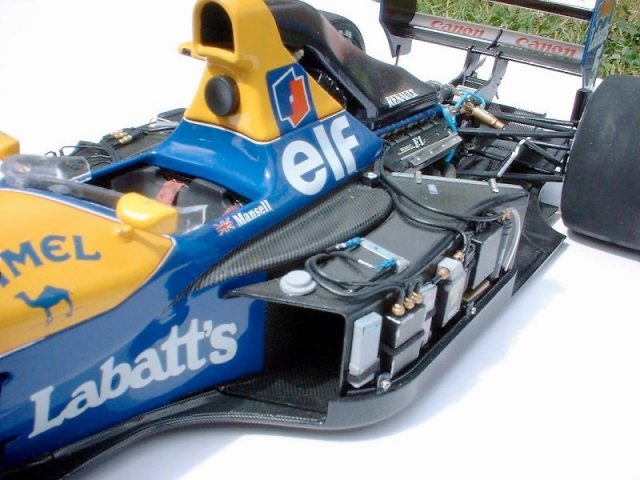
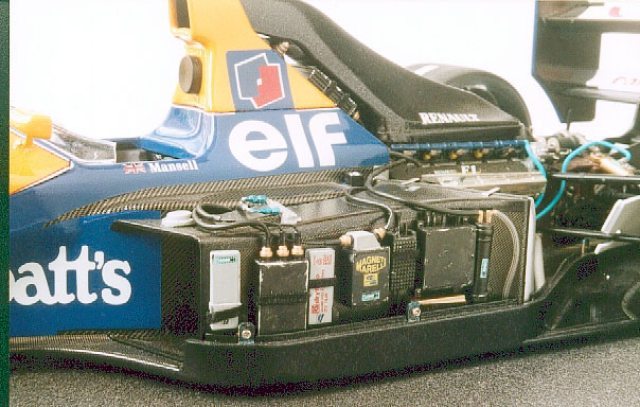
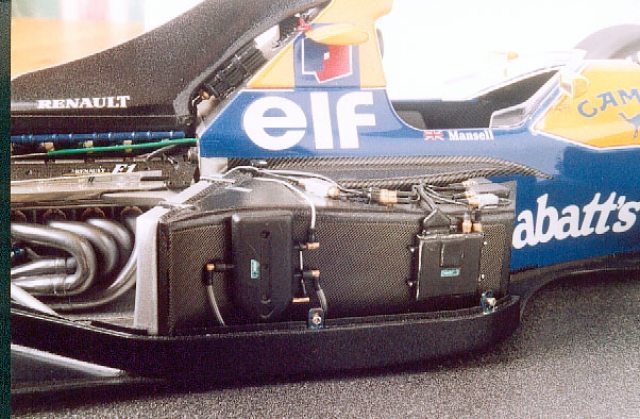
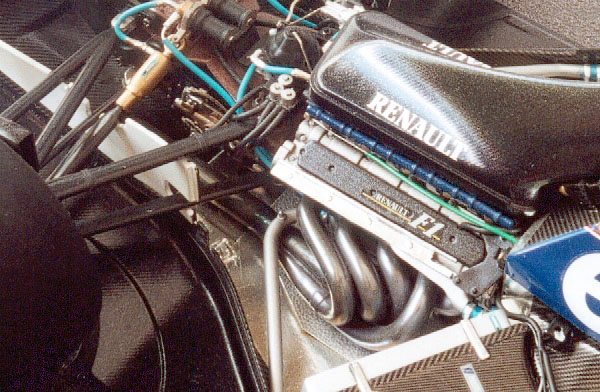
This really depends on just how important it is to the individual, as none of it can be seen when the cowling is screwed down ( and it takes five minutes to undo it ), but for me, I know it's under there, so I feel happy! So, get yourself some resin F1 Electrical Connectors, and plumb away! Parts E65 and E66 are sort of shield units which benefit from covering with Bare Metal Foil (chrome). In fact, the metal foil in the kit is very thick, and difficult to work with. I replaced it totally with Bare Metal Foil, which if applied carefully looks amazing.
General recommendation - this paint is pure, hard, durable, and acts as a base coat for all of the overpainting for the blue and yellow later. In fact, since discovering it, I have now adopted it on all my work as the base layer, irrespective of final colour, as it neutralises the effects of overpainting. After this, the tub was cut and polished, then sprayed with Halford's Regatta Blue, which is the best match I have found for the dark blue, and is frankly a million miles from the kit decals, which should be thrown away. Carbon fibre decals As previously mentioned, I used the Scale Motorsport system extensively on the model. Specifically, I used the 1/12th Carbon Fibre for the heavyweight patterns on the tub sides, rear and interior. The radiator ducts appear to have a lighter weave, and looked better using the 1/20th version. Check out the box art to see what I mean. Again, I went to town with the details of the electronics/telemetry equipment on the sides of the radiator ducts - throw away the kit wiring, use fine ignition wiring (approx. 0.5 mm dia. is a good scale match ) and some electrical connectors, and the improvement is immense. Finally, a bit of weathering on the electronic modules to represent damage from repeated transfer from chassis to chassis really brings this area to life. Part II > Click Here |
||||||||||||