|
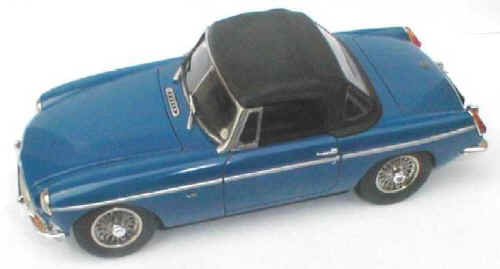
The story of the MGB V8 is well known to enthusiasts and began with Ken Costello, who in the 1960's shoehorned a Buick 3.5L motor into an MGB. Costello used the Holley carburators between the 'V' of the engine and provided a bulge on the bonnet (hood) to facilitate it. It wasn't long before British Leyland heard about his conversions and the Chairman, Lord Stokes, asked Costello to demonstrate a car to him. As the story goes British Leyland stole the rights to the Buick engine to replace their ageing MGC, which used the 3000cc straight six iron block motor, and which had not had a good reception from the Motoring Press. (In fact the MGC wasn't such a bad car - but that is another story). In time the supply of the new V8 engines was cut off from Costello who then proceeded to buy lorry loads of second hand units from Belgium and rebuild them
with new parts!
|
|
|
To keep the bonnet line British Leyland replaced the Holley Carbs with SU HIF units sited at the back of the block and the MGB GTV8 was launched in 1973. Sadly it was never made as a Roadster or exported to the US and sales suffered in Europe due to the OPEC fuel price rises.
A V8 roadster then is always going to be a hybrid, and a good Costello car will bring a high price in the market place today, but there are plenty of converted cars still being built by MG enthusiasts all over the world.
|
The conversion
I have previously built two white metal kits from South Eastern Finecast and have been very pleased with both of them. Seven years ago I purchased their MGB GTV8 kit to build a replica of my own car.
Unfortunately I never really got the complex eight piece body quite right to my own satisfaction and so the model has remained tucked away out of sight in my collection. On a recent visit to my local model shop I saw the Airfix kit of the 1/24 MGB roadster. As often happens I had gone there for something entirely different, but came away with the kit with the idea of using it to convert into a V8 roadster using parts from the white metal GT. Would the £14 ($10) Airfix kit convert into an acceptable model?
Firstly the white metal kit was carefully taken apart and the pieces put into two piles. The ones I knew I would definitely use and a 'maybe' pile. Having studied the build method of the Airfix kit I decided to discard their suggestions and build up a body monocoque similar to that used in the real car and then fit it out with the engine, suspension, interior etc as I would if I were building a full size vehicle.
I phoned Dave Ellis at South Eastern Finecast who kindly agreed to supply their photo-etched MGB wheels and metal windscreen parts as used in their own roadster kit.
|
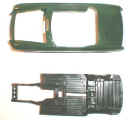
The white metal pieces were stripped of paint and cleaned ready for use. The bonnet (hood) was cut out of the plastic body along with the engine and transmission details from the floorpan.
|
|
|
The white metal parts were adapted to fit so that a complete bodyshell could be made up and a lip provided around the engine bay, made from thin alloy. The plastic floor was replaced with the metal one to take the wider gearbox but the plastic inner sills and rear seat retained, as were the seats from the Airfix kit.
|

|
|
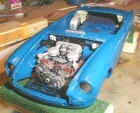
When the basic body shell was completed the primer was rubbed down and the shell sprayed with Rover Electric Blue from a rattle can, this was eventually cut back with T-cut and polished.
|
|
|
|
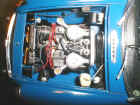
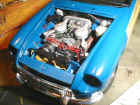
A closing plate, made from thin alloy had to be made up in front of the cooling fans. The oil
filter was scratch built and wire used for the pipe connecting it to the oil cooler which sits just behind the grill.
|
|
|
Underneath the model the plastic front cross member was retained and new stub axles built to accommodate the photo etched wheels. Front brake discs are metal and the rear drums are from the Airfix kit. The front and rear suspension were lowered and the metal parts used for the rear axle assembly, suspension and exhaust system.
|

|
With the exception of the headlights the chrome trim is from the Airfix kit. Unfortunately a slight size difference meant that the metal bumpers could not be used. The small photoetched V8 logos and MG badge are again from the South Eastern Finecast model and were stuck onto the bodywork using clear varnish. MG club badges and a UK tax disc were added for more realism.
HT leads, throttle cable and screenwash tube were made from fuse wire Hoses were made from different sizes of wire insulation with fuse wire inserts to maintain shape. Wiring loom made from copper strands taken from 1mm wire, twisted together and covered in Maskol then painted. Other scratch built items from Milliput epoxy putty and fuse wire. Alloy panels from alloy adhesive tape folded on itself to required thickness.
Apart from the Rover Electric Blue paint already mentioned interior door panels and seats were sprayed with Satin Black (from a distance of about 2ft to give a vinyl /leather look) and the hood and tonneau similarly treated with Matt Black. Paints were all acrylic and from rattle cans.
Conclusion
Was it worth it? I'll let you be the judge. For me at least there is certainly more sense of achievement than following the normal kit instructions. To anyone else thinking of doing a conversion I would thoroughly recommend the challenge.
|