|
|
|||||||||||||||||||||||||||||||
|
Cars |
|||||||||||||||||||||||||||||||
|
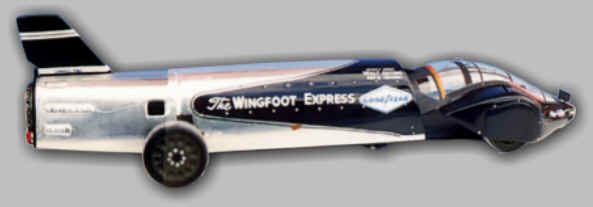
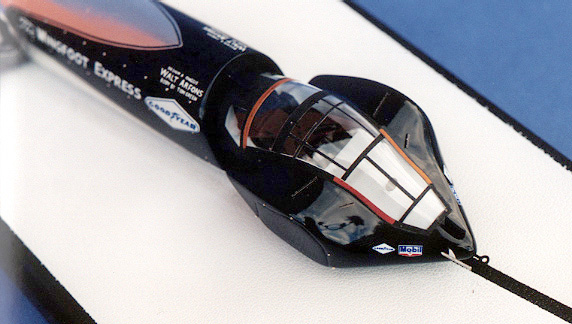
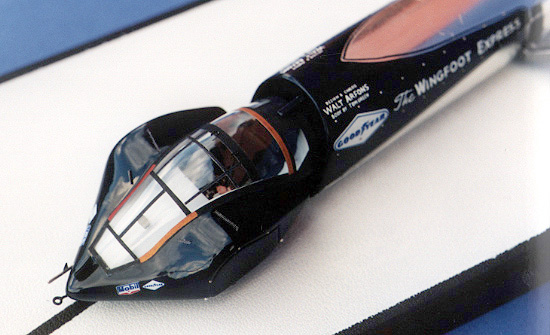
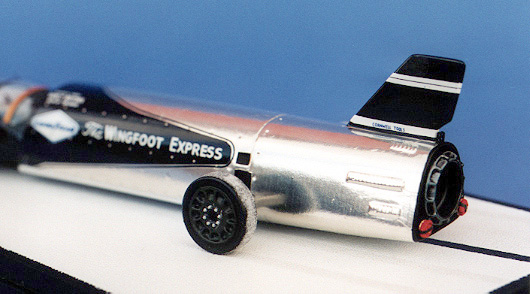
Walt Arfons' 1964 "The Wingfoot Express" |
|||||||||||||||||||||||||||||||
|
by Claude Reiser © 2006 Modeler Site |
|||||||||||||||||||||||||||||||
|
Legal Notice No material from Modeler Site any Web site owned, operated, licensed, or controlled by Damian Covalski may be copied, reproduced, republished, uploaded, posted, transmitted, or distributed in any way, except that you may download one copy of the materials on any single computer for your personal, non-commercial home use only, provided you keep intact all copyright and other proprietary notices. Modification of the materials or use of the materials for any other purpose is a violation of Damian Covalski's copyright and other proprietary rights. Read More here > Legal notice
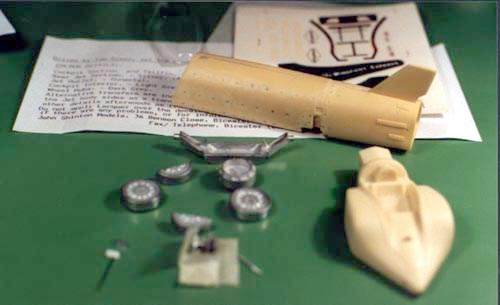
Preparing the body In preparation for priming the main body parts, I filled and sanded the existing " rivets ", which took me some time, until I realized that ordinary filler would not do (the filler tended to " pop " out of the tiny rivet holes once I started to sand), and swapped to gap filling super glue. I also re-scribed the panel lines, and took measurements on pictures to drill new holes for my sensational new ultra fine turned brass, nickel coated rivets. I did fuss about a lot with a jig and very thin aluminum foil, trying to make new air vents for the rear section of the body, but my output lacked the required evenness in design. In the end, I just let them be.
All parts having been prepared properly, I applied a coat of primer, sanded, checked for blemishes, and re-primered where necessary. During sanding I broke off the rear fin, glued it back on again using superglue, sanded, primered, …
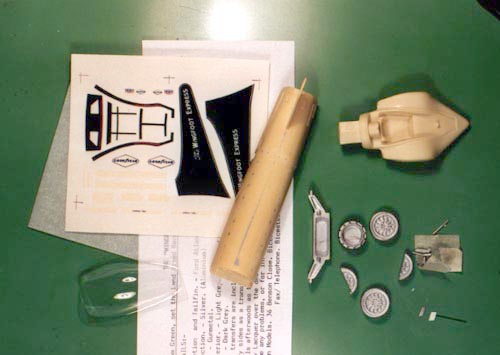
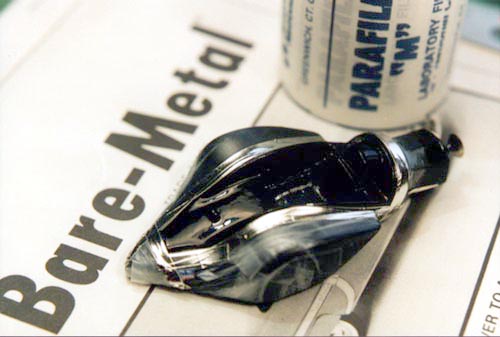
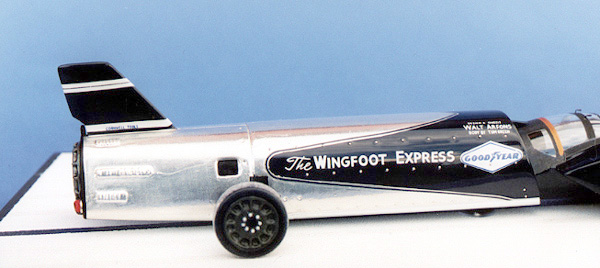
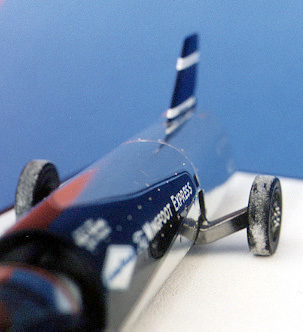
The decal sheet offers two options as to how to reproduce the two-tone paint on the rear body. You can either paint the entire piece silver, then apply the dark blue decals with the " Wingfoot Express " lettering, or you can paint silver, mask the blue areas off, paint blue, and apply the separate " Wingfoot Express " lettering. I decided to use a hybrid option : Painting the blue, and replicating the natural metal finish using bare metal. After all, the real thing was polished aluminum panels, and not silver colour ! This meant I had to paint blue first, apply bare metal, then cut out the areas where the blue colour should show. Applying the bare metal It was rather tricky, much more than I had hoped it would be. I intended to use " matte aluminum " foil, but that is much stiffer than the usual " chrome ", tends to distort and crack while removing it from the carrier ; in fact, I ended up with a very big mess. So I removed the foil from the model, and was left with the adhesive still on it! Careful rubbing with diluted alcohol, and subsequent buffing with polish and wax restored the original glossy finish more or less. So I swapped to " chrome " foil, which, albeit easier to use (at least you can remove that one from the carrier without wrinkling and distorting) was not altogether easy-going. On a piece of aircraft fuselage I tried different techniques, like first covering the parts in foil, then trying to smooth out the foil (à complete disaster !), working in small areas at a time (the model looked like patchwork afterwards, which would be nice on an aircraft, but the Wingfoot Express was essentially a one-piece smooth panel!). In the end, I decided to combine these techniques. The rear " fuselage " of Wingfoot would be treated in four steps : The front half in one piece, the rear half in two pieces (one each side of the fin), then the belly. These areas would each be covered by one large piece of foil, which I removed completely from the carrier, aligned to the lower edge of the body, and then I started to work my way around the body by carefully smoothing out the foil, inch by inch. All this of course wearing rubber gloves, as your fingers will leave oxidation prints on the foil (well, mine do). I still ended up with too much wrinkles in the foil! Should have re-read the articles from our friends of the aircraft modeling section, who excel in the art of producing " natural metal warbirds " by applying bare metal foil.
Once the foiling done, the blue areas to the front of the body had to be uncovered from the foil. Using photocopies of the decals as I guide, I had previously cut a template from thick soft plastic stock (wrapping material, I think), which I now positioned carefully over the area where I thought the " Wingfoot Express " lettering would be lurching under the foil. (Of course, I used the rivets as a fool-proof orientation mark !).
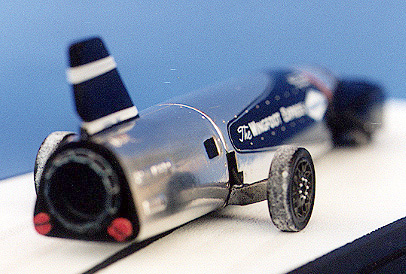
All I had to do now was to add the rivets ; I had looked forward to this part of the job, and although it was tedious, I managed to glue all 50 rivets in place with just one of them disappearing into Nirvana (" pling " off the tweezers !). And they look fabulous, and they are " to scale " !
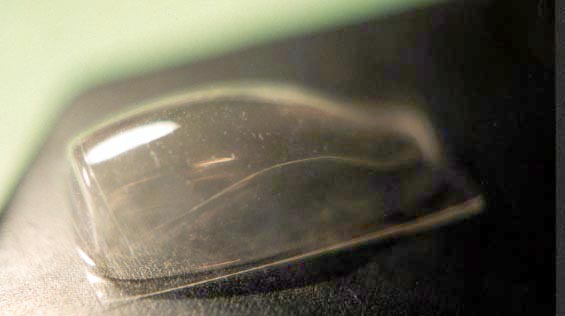
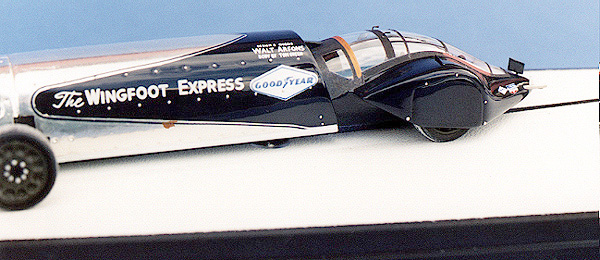
Using 3M surgical film Big Mistake ! The canopy was some 3 millimetres too short ! Luckily I was going to use my self-adhesive canopy-frames, because with the decals this error would have shown even more dramatically on the finished model. In order to paint the interior of the cockpit light grey, I masked the nose using Parafilm-M, a flexible surgical film made by 3M which is ABSOLUTELY perfect for quick, non-bleed effective masking, with Bare Metal Foil used for the razor sharp edge, leaving the inside of the cockpit free to be painted light grey.
You can now wrap your model in Parafilm-M, and have two options as for the creation of the separation line between colours. For really sharp lines, you just need to burnish the Parafilm on to the model by using your fingertips, then cut along your line with a fresh blade. Unless you use tornado boost on your airbrush or spraycan, Parafilm-M will not lift, not even over tight curves and bends.
This time I did not want to put too much effort into the cockpit. It could sure do with some detailing, like replacing the cast in seat belts with real ones, detailing the steering wheel, adding real instrument gauges, etc. I just painted the seat and the dashboard black, and added some photo-etched fittings to the seat belts. I glued the canopy using Provence Moulage's " Rhodoid glue " which is very good for gluing small details as well ; in fact I use this stuff far more than any other type of glue, including CA.
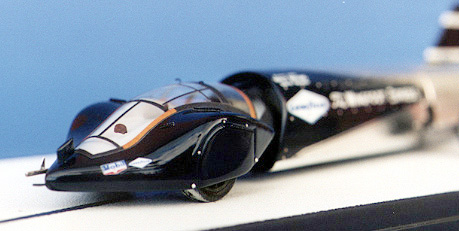
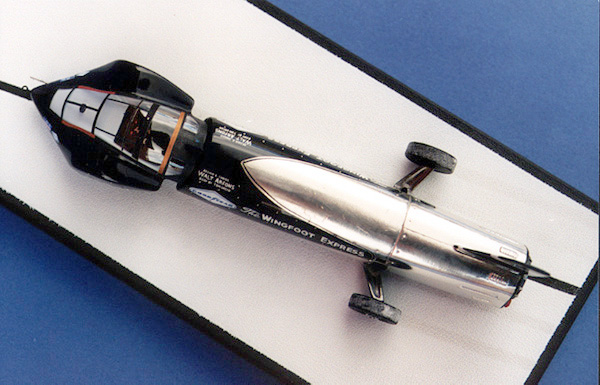
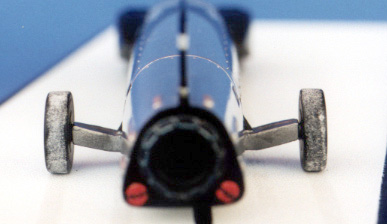
I had to give the tyres a crust of salt on their tread-area... Before final assembly, and as I had decided to show the car in its natural environment, I had to give the tyres a crust of salt on their tread-area. This can often be seen on the cars at Bonneville Slat Flats, and I wanted to know whether it would look good on a model. Instead of using baking soda (used by some modelers to replicate snow), I had a small bag of " artificial snow, for dioramas ", which I thought might look even nicer ; I had also read that baking soda tends to go liquid with time. I guess that it sucks up moisture from the air, and starts to liquefy or even rot. Something inorganic seemed safer, so I rolled the wheels/tyres through a puddle of matte varnish, and then through a patch of poured "snow", which I think is actually made of ultra fine glass balls. Final assembly... It was quite straightforward. First I glued the cockpit section to the " fuselage ", then I added the rear wheels (all glued using two-part epoxy resin). The rear axle was painted steel, and buffed to a realistic sheen. As there was a problem with alignment and camber on the front wheels, I pressed them into very tiny beads of epoxy putty I had put into the wheel wells. By using epoxy putty, rather than glue, you can adjust ride-height, alignment and camber of the wheels just by pulling and pushing them until they look right. The wheel will not tend to slip or spring back into an awkward position, and the putty is usually stiff enough to support the weight of the model while it dries without any sagging or tilting. This is an easy way to assure that the car is level and that all four wheels touch the ground, and can be particularly practical on road/race/rally cars as well, because it allows you to set the ride-height of the model whilst fixing the wheels : Drill the axle holes or slots larger than required, apply the putty, then just press the model further and further down on its wheels until it looks right, then let go and let dry !
I allowed the glues and putty to harden for a day, then set the model on a piece of sanding paper, glued to a large piece of glass ; with circular movements I sanded all four wheels slightly flat, so that the car has a nice, hefty " sit " on the ground. I do this to most models that come with resin or metal " tyres ", because these tend to stand on their wheels in a rather spidery way, whereas the real thing always has a contact point the size of a postcard between tyres and ground. Into the flat spots on the tyres I drilled holes for the fixing screws. Whenever possible, in a diorama, I try not to fix the model with the usual " straight-through-the-floorpan " screw.
All there was left to do, was to take a nice display case (AMT-Ertl in this case), and paint the base " salt flats white ", and add the mile long black line showing the direction to take. As it would have been difficult to add the shallow depressions left by the tyres of the car in the salt surface, I just masked these tracks off, and dry-brushed very subtly with flat black. Conclusion As a conclusion I can say, that although I goofed on some points, and that I should have opened up, and detailed both the jet exhaust itself, and the jet interior, the model looks quite impressive and is a very welcome addition to my ever growing collection of LSR models. It's not an easy model to build, especially if you choose not to go with the decal option for the two-colour paint scheme, but it is definitely worthwhile to take your time and build this kit. The Wingfoot Express 2 "rocket car" will be the next to join my collection; to be continued… References "Bonneville Salt Flats", Louise Ann Noeth Special tools/materials used 0.5mm rivets by Präzisions-Modellbau Dipl. Ing. Hans-Joachim Nolte
Support us ordering our notes in PDF > Here |
|||||||||||||||||||||||||||||||