Legal Notice No material from Modeler Site any Web site owned, operated, licensed, or controlled by Damian Covalski may be copied, reproduced, republished, uploaded, posted, transmitted, or distributed in any way, except that you may download one copy of the materials on any single computer for your personal, non-commercial home use only, provided you keep intact all copyright and other proprietary notices. Modification of the materials or use of the materials for any other purpose is a violation of Damian Covalski's copyright and other proprietary rights. Read More here > Legal notice Introduction Painting seems something mysterious to all of us modelers, some kind of wizardry out of our knowledge. However, what a big satisfaction we get when we finish our project and we see that it almost reached what we’ve dreamed, and the key to all that is painting. Generally speaking, whenever we finish a model we make an evaluation of it based on the painting, basically the painting of the body, in cars and motorcycles, then, we take a look at the “other” work, detailing, perhaps the most difficult, which is the one that “personalizes” our creation. Why does it have to be this way? Is painting a problem without solution? Of course not. Most of us, who belong to a modelers group, always read messages asking for tips on how to paint, and some of those messages are really desperate. Maybe we modelers can build models with different degrees of difficulty, but when it comes to painting, we run out of imagination? Of course not, here again. All of us invest a good deal of time and money, searching for materials and developing techniques in order to finish a model and make it look like the ones in the magazine covers, that apparently, they are only at the reach of a few “illuminated” minds. We believe that the problem lies in the very little information that we have for the building of our first model. For instance, when we were kids and used to assemble Airfix models in 1/72 scale, all we had at hand was an instruction sheet with some information on how to assemble the kit, and that was enough for us to build the model, but there was not a word on HOW TO PAINT that model, maybe the colors! but never how to put them on. Except for the use of brushes, to paint some little details, instruction manuals keep the same old costume of not giving information on how to paint, what sequence we have to follow, and the techniques. Perhaps Tamiya mentions the use of brushes and aerosol cans, but they never say how to use them. So, the answer seems to be in planning our building sequence. To plan ahead on what kind of paints and colors we are going to use, prepare the tools that will use, knowing a certain amount of basic techniques, even if they are not the best; that is the secret, to our belief, to a successful and happy final in the “not so ease”, but very rewarding, way to build a nice model. Preparation Before we begin a project we must think on what we want, because a good deal of our final success is because of this preparation. If you are a beginner, or built models when you were a kid, and are coming back to this activity, our first advice is to build a simple model, one that you like very much, but, and here comes the interesting part… without painting it! What do you mean? No painting in a “painting note”? YES! First, you must get familiar with the new materials and techniques. But for the time being, enjoy building it without the pressure of making a good paint job, HAVE FUN, because this is the main purpose after all; build it carefully, taking care of the glue joints, they must be invisible, giving your best quality to your work. You will be proud of your model, even without painting it. When you have overcome all the joy that you got from your first model, you will begin the construction of the second one; but this time, you WILL paint everything. For this second model (plane, tank, ship, truck, some special type of car), the list is endless, lets think about one of the most popular kind: planes, military vehicles, or cars, we are still trying to find out which one is our favorite. This is very important concerning painting because, for instance, planes and military vehicles are finished in matt colors. On the other hand, if we choose a car of any kind, normal or competition, almost ALL of them have a mirror like finish. Here are some rules
An airbrush is a device that atomizes paint and allows us to put that paint over a plastic surface, or any other kind of surface. It is important to say that the more you master the use of this tool, the better results you will get.
Airbrushes are divided y three different categories basically: External mix (Badger 350 and Paasche H series), single action internal mix (Badger 200), and variable action (Badger 150 and Paasche VL series).
We only mention two brands, why? Maybe because these are the most popular, and they are available almost worldwide; there are many other brands, but they are more expensive or more complicated in its usage. All this models have three different heads: Fine, Medium, and Heavy, and they give you the versatility to spray any type of material.
The head size indicates the amount of paint that you can spray, and the “fineness” of our work. But, I got a little out of the theme, we are talking here of building our second model, and we want to know which of these airbrushes will be more appropriate for our job.
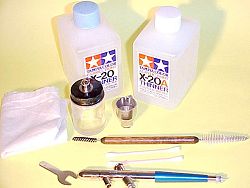
For the authors, the best will be the single action external mixture one (Badger 350 and Paasche H), or the internal mix single action (Badger 200). The first ones (external mix) are very easy to clean and service, as for the second one (Badger 200), the cleaning is a little more complicated but it also is a very good airbrush. Lets not forget the “power supply”, what really “moves” the airbrush, the compressed air source. You can get this compressed air in several ways, but the most recommendable is an air compressor.
For our specific activity, we can do it with a small one, one capable of delivering 30 lbs. is enough. There are three different kinds of compressors: Diaphragm (not too noisy and very commendable), Piston (not very commendable, because it is quite noisy), and the Compressed air cans (the most utilized by beginners because they come with most of the airbrush kits).
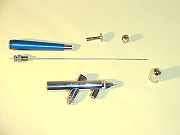
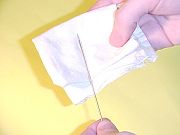
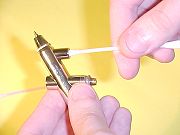
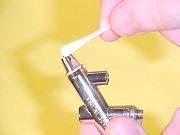
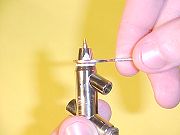
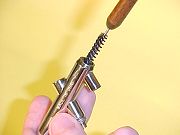
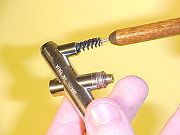
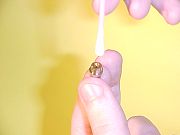
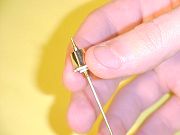
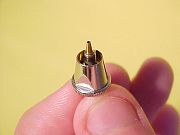
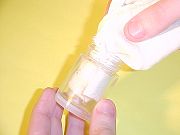
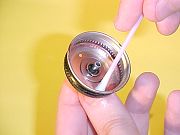
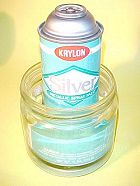
The Badger 200 is a little more complicated, but nothing out of this world. In this model we must take out the needle, be careful when doing this because the air plunger becomes loose and it will fall. To clean the elements all you have to do is to put the head assembly (Badger 350 y Paasche H), in a little jar and cover it with the same thinner you are using for the paint: thinner, turpentine, alcohol, mineral spirits, etc. and a little brush. For the Badger, you must clean the needle and nozzle assembly with a cotton swab thinner-soaked, and pour some more thinner through the jar “hole”, with an eye dropper, or something similar, forcing it through the head assembly; after that, we will dry everything using compressed air. If you follow these little experiences, more than “advises”, you will have a painting system that will last for a long time, giving you many pleasant moments and results you will be proud of.
Cleaning a Badger 200
Paints Now, you’ll have to make a decision, you have to decide on what paint you are going to use. Here, we have a wide variety to choose from: enamels, lacquers, acrylics, artists paints, inks, etc.
Besides all these, there others specially made to manufacturers specifications, (e.g., SnJ aluminum, which has different properties than Tamiya, Gunze, Aeromaster or Testors, Humbrol, to name a few), this SnJ paint is a special paint whose metallic finish is very realistic.
We could go to a great extent on this subject but, for the moment, we will mention only the most well known worldwide (Testor’s, Tamiya, Gunze, and Humbrol), although me must say that they are very expensive. In our case, the rule will be to begin with the most versatile and “easy” to apply: Testor’s or Humbrol enamels. Both are very high quality paints and we recommend to thin them with mineral spirits, for gloss finishes, or their own brand thinner. Testor’s has a very good thinner for these purposes.
We must choose a kind of paint for engines, chassis, frames, wheels, chrome, and bodies, in cars and motorcycles, and interiors, fuselages, weathering, etc., for planes, tanks, military vehicles, and ships. As a general rule, we can say that To highlight small details (rivets, screws, etc,) we must use a 0, or 00 brush, and enamels. Transparent colors, like the ones in the Tamiya line, are very well suited to paint over clear parts, to achieve the desired effect: red for tail lights, amber for signal lights, green for wing tip lights, and so on.
When we talk about acrylic paints to be applied with a brush, we are referring to the ones that you can thin with alcohol (Tamiya, Gunze, etc.), because there are other acrylic paints like enamels and lacquers; but we won’t take them into consideration because of its aggressive nature.
Spray cans deliver more paint than airbrushes, so the strokes must be at a faster speed, in order to avoid “runs”. With this paint system, as with the airbrush, the “golden rule” is to make a test on a piece of glass. We say glass, because there are many beginners that “try their hand” at painting on a piece of cardboard which, due to its absorbing nature, won’t let the paint to “run”, if you apply too much of it. We must keep in mind that, at the beginning, you shouldn’t use acrylic lacquers or enamels, because these are very aggressive materials that CANNOT be applied directly over plastic. You must use first some kind of automotive primers, in order to use them over plastic. But this is another subject that we’ll talk in a future article. At this stage, we must emphasize the importance of painting in a WELL VENTILATED area. Paints contain toxic substances, that is why is so important to wear a protective mask (you can find them at good paint shops). Remember, this is a hobby, not a way of getting a lung disease. Finally, we must select a certain amount of colors and types of paint according to the job that we will begin, know their properties, the ways to thin them, and how to work with brushes and an airbrush. |