|
|
|||||||||||||||||||||||||||||||||||||||||||||
|
Motorcycles |
|
||||||||||||||||||||||||||||||||||||||||||||
|
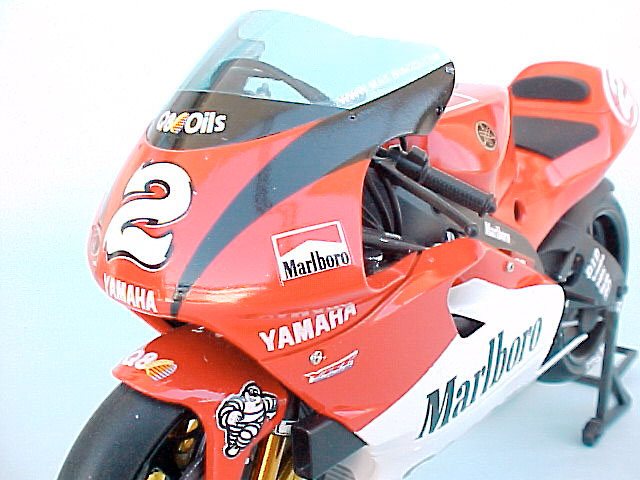
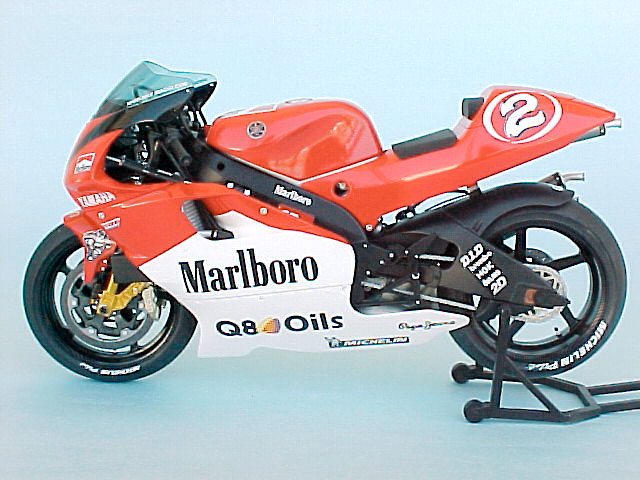
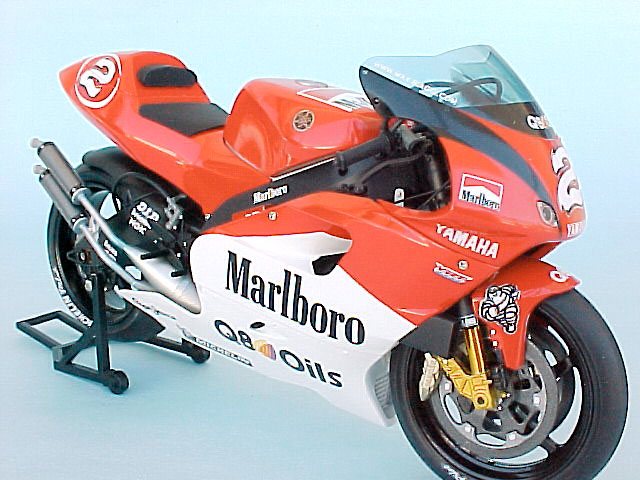
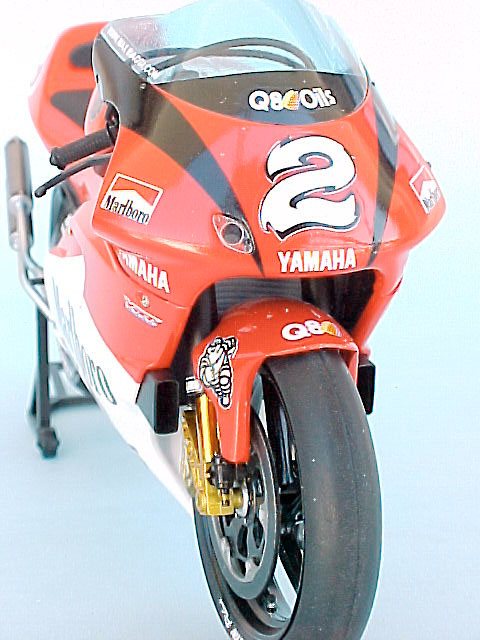
Yamaha YZR 500 1/12 scale Marlboro team |
|||||||||||||||||||||||||||||||||||||||||||||
|
by Nicolas Perez Fiorentini |
|||||||||||||||||||||||||||||||||||||||||||||
|
The Yamaha YZR500 and the Motorcycles World Championship During 1992, the YAMAHA WCM YZR500 made their first appearance in the GP 500 series. Considering that the team WCM was an independent entry, they had a succesful racing season. By mid 1997 season, the Austrian company Red Bull became the main sponsor for the WCM team giving them the necessary support to make this official team, a very competitive one. In 1999 YAMAHA introduced their new YZR500 model, this was the main challenger to the powerful HONDA NSR500 which, ridden by the Australian Mike Doohan, took the last five championships in a row.
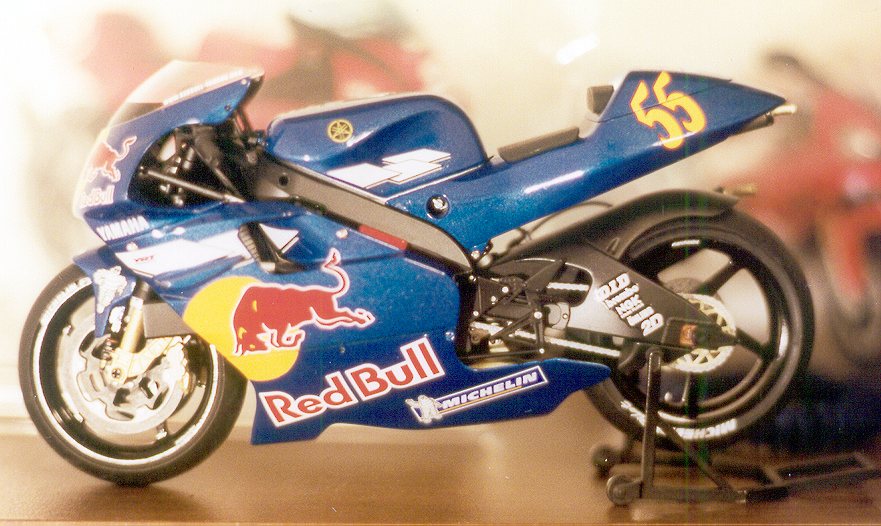
Because on an accident suffered by Doohan, with the subsequent retirement from the Honda team, the official works team YAMAHA-MARLBORO was looking forward to the championship with their two pilots Max Biaggi (as number one in the team) and Carlos Checa as the almost sure winners. Among the most powerful teams were the YAMAHA-MARLBORO, RED BULL YAMAHA WCM, and the surprise in that season, the team YAMAHA-D´ANTIN and his almost "kamikaze" pilot Norifumi Abe.
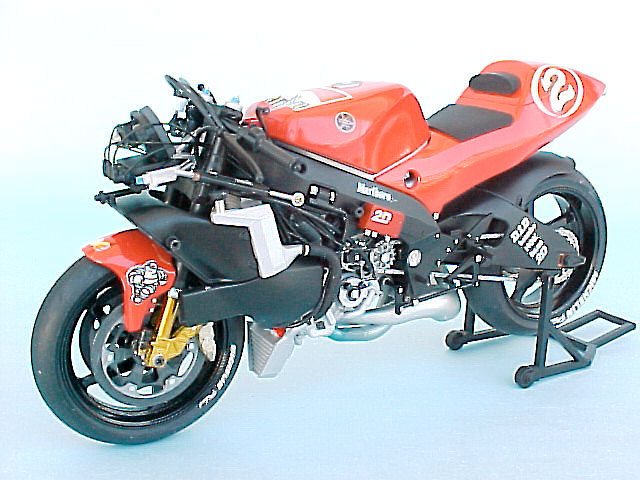
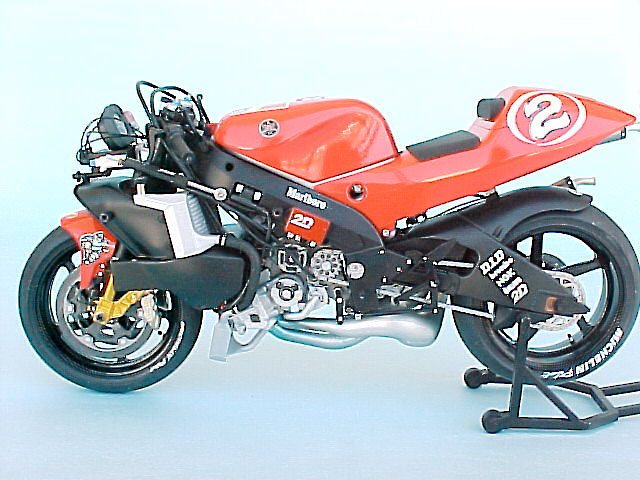
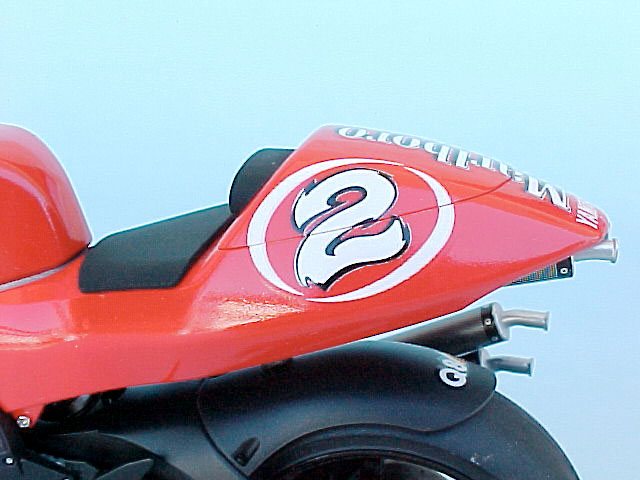
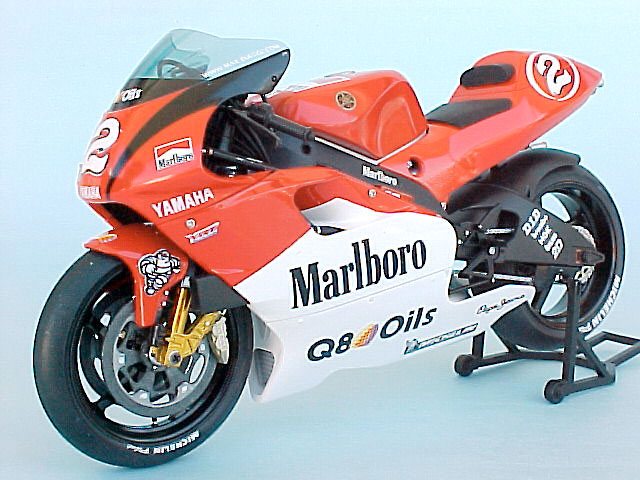
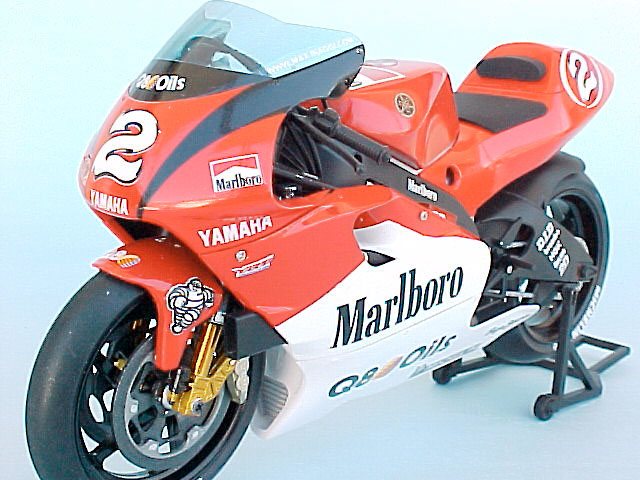
I used these decals to build the version that raced and won the Gran Premio de Argentina. The only diference between this motorcycle and the ones that raced in Motegi (Japan), South Africa, England, or Malaysia, were the "side wings".
Building the YZR500 Each modeler has his or her way of building a kit; mine is to put together all the pieces that go in the same color, and paint them all at the same time, no matter the step in the instruction sheet. In this particular case, I'll try to explain the building sequence, painting, and the possible difficulties that you will encounter along the building and how to overcome them; for that purpose we'll stick to the building manual steps.
First, I must say that all the possible versions that we can build (Antena 3, Marlboro, or RedBull) have the same interior colors, the difference lays in the fairing decoration, which is totally different, depending on the version you are depicting. In this little guide I'll concentrate on how to assemble and paint the YAMAHA-MARLBORO version, and give some hints on how to decorate the other two versions.
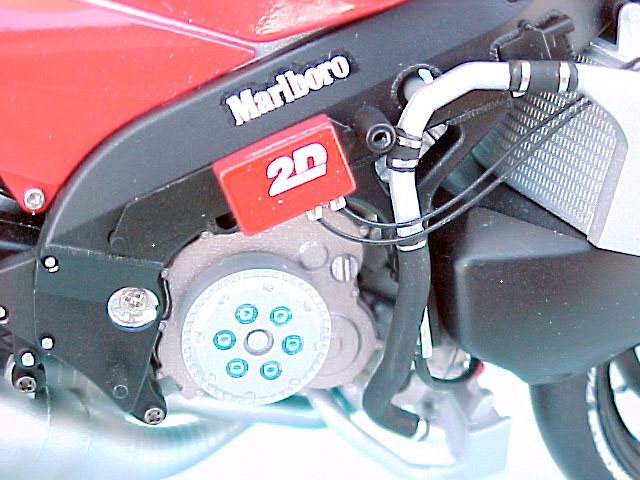
Step 1 (Engine) For this step, the instruction sheet shows how to paint the engine block with the corresponding air intake and the valves. I painted the air intake semi gloss black, once the paint dried I masked it and painted the engine block metallic gray. According to Tamiya, the engine cover (part B38) must be painted dark copper (XF-28). This is correct in case you want to build a "brand new" motorcycle, but if you prefer to give the model a "well used" appearance, then the adequate shade would be a mixture of 4 parts metallic gray and 1 part copper.
Step 2 No modifications.
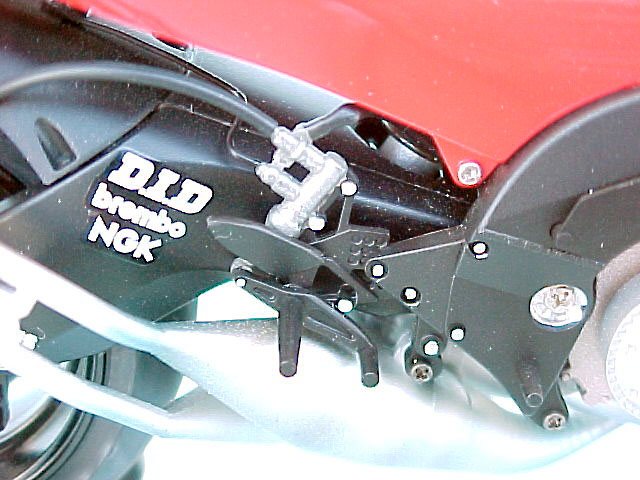
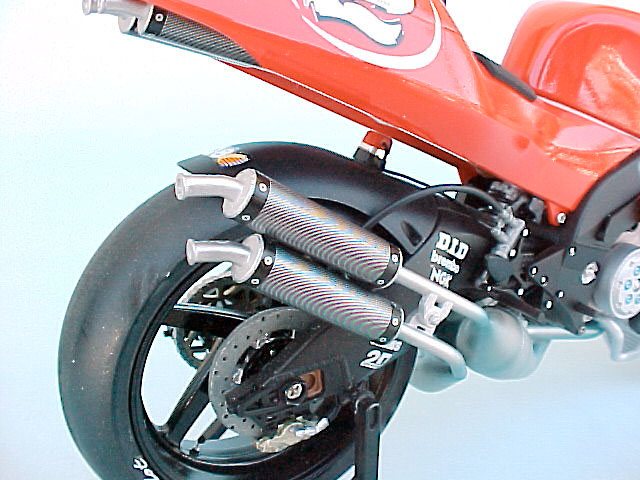
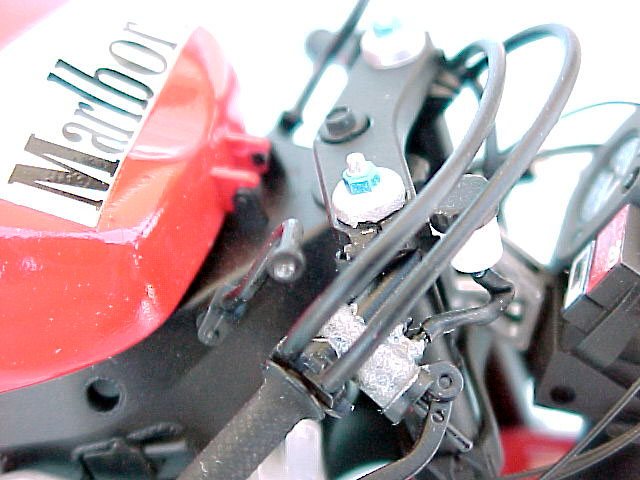
Step 3 (Frame) Here we must make a choice on what version do we want to build (Regis Laconi, Gary McCoy, or Simon Crafar, for the RedBull version). "A" and "B" versions have the rear brake cable straight from the handlebar to the caliper, whereas in the "C" version the cable goes from the handlebar to the brake controller, and from there to the rear caliper. Depending on the version you choose you must leave, or take off, a little part, according to the instructions. For the Marlboro version we must build the "A" version for both mounts, Biaggi or Checa. The frame and all the pieces glued to it are painted in semi gloss black (X-18) with some nuts painted in silver color. These colors are the same for all YAMAHA YZR500's.
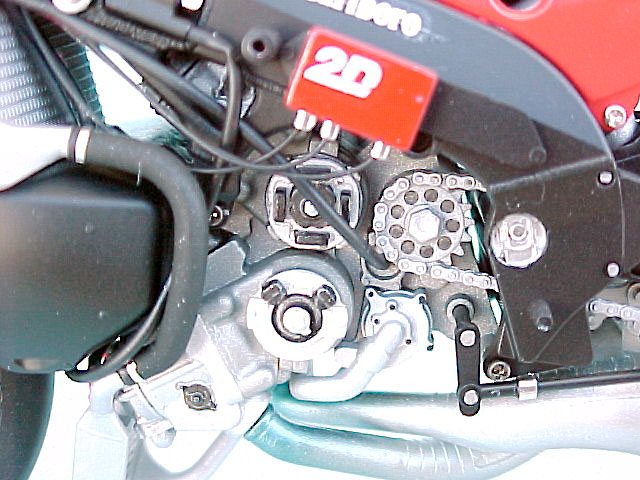
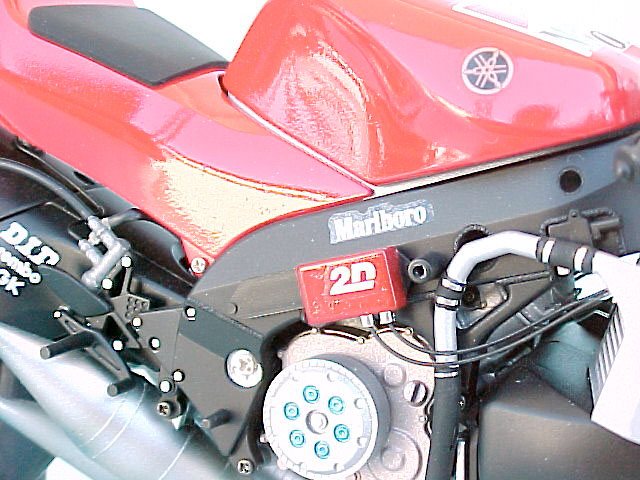
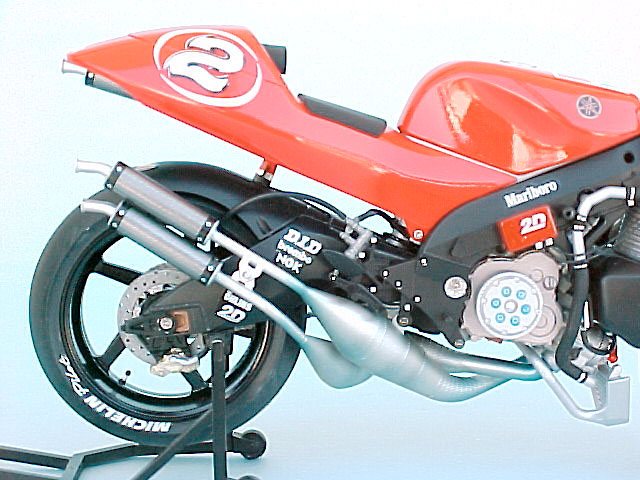
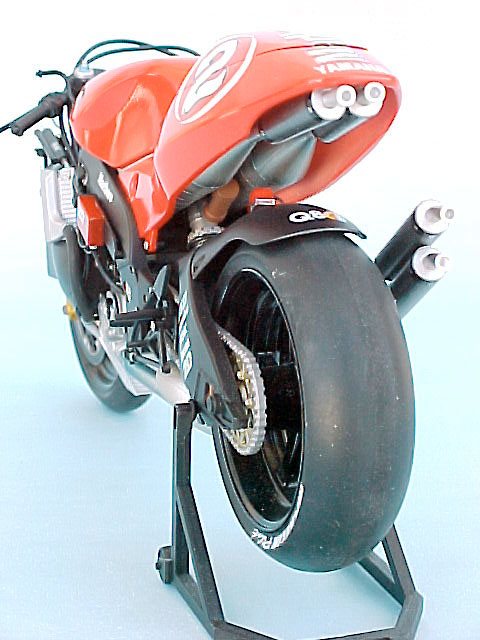
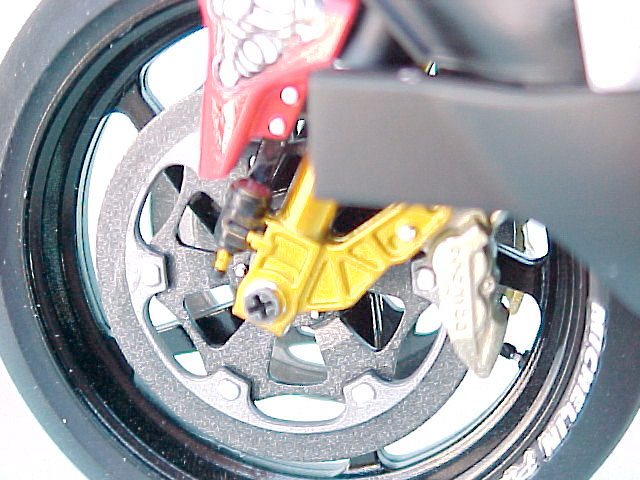
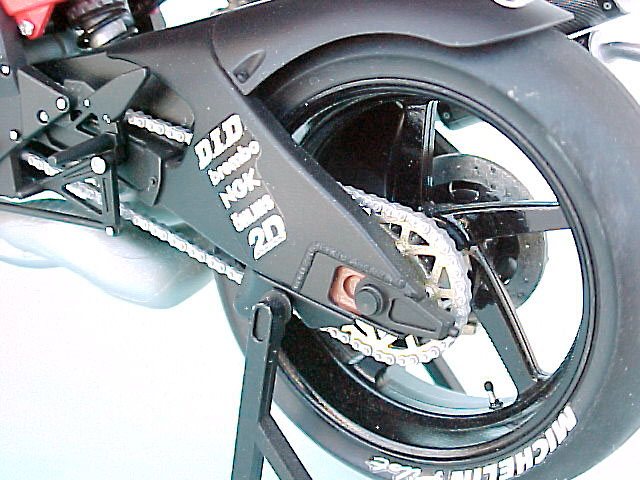
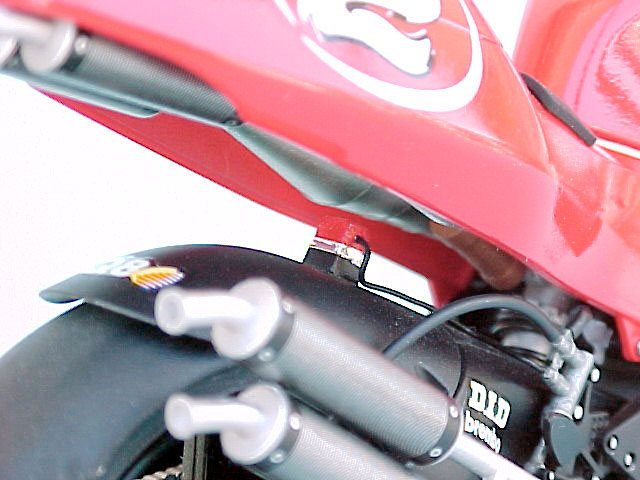
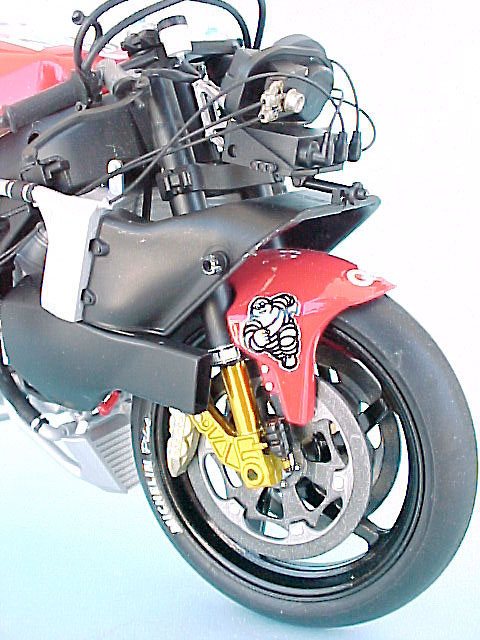
Steps 4 & 5 These two steps shows us how to assemble the radiator and the rear wheel with all its ancillaries. This part is a little bit complicated because we have to paint a lot of parts, some of them in three colors, like the chain and the shock absorber. I covered the rear shock piston with BARE METAL FOIL, to make it look chromed; we also build the rear wheel with the brake disk, we will paint the disk and the wheel before gluing them together. We drill the venting holes in the disk, to make it look more real. The YAMAHA has a little box over the rear mudguard painted black in the base, and red for the rest; this is a computer not provided in the kit. I made this from a plastic piece filed to the correct shape. There is a cable coming out of the box, I made this with copper wire.
Step 6 In this step we only install the rear swing arm in the frame and put the corresponding decals, which are the same for the three versions (Antena 3, RedBull, and Marlboro).
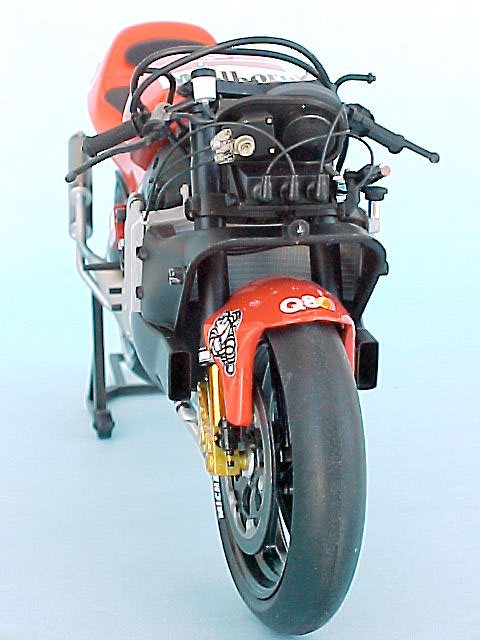
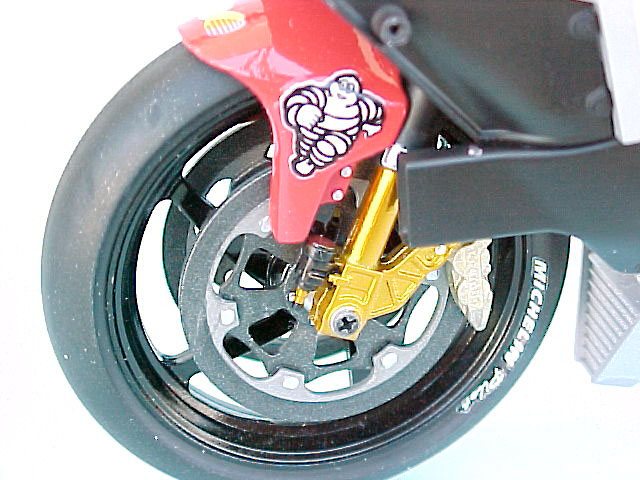
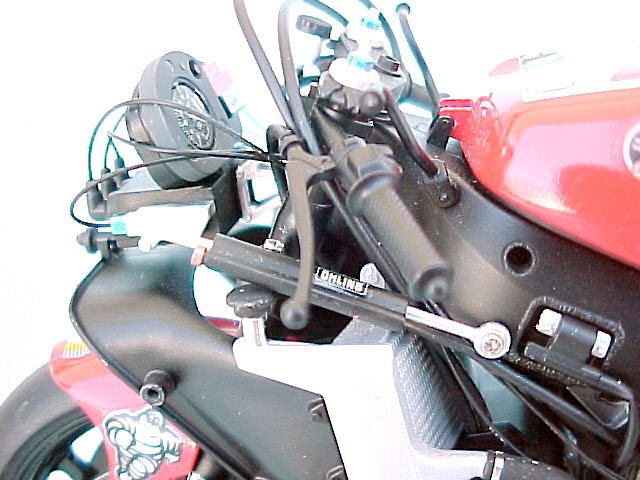
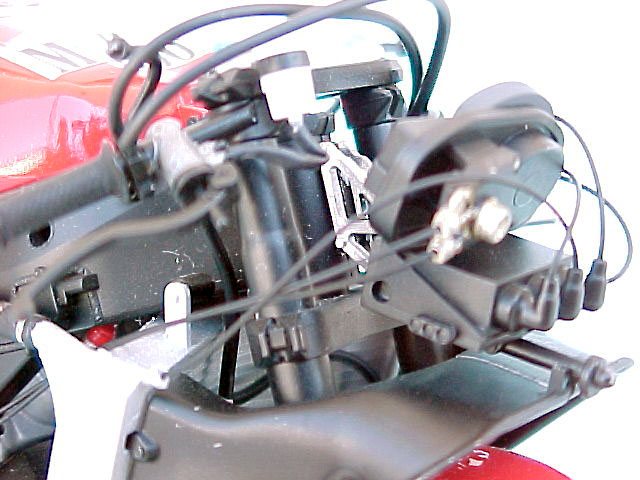
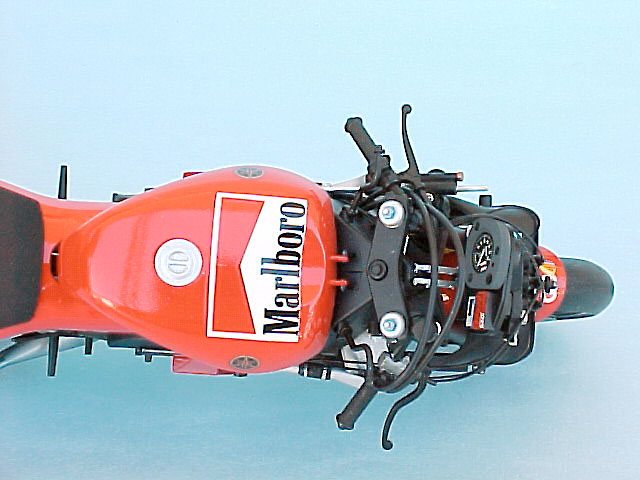
Step 7 In this step we are going to build the front fork. I think this is the most difficult step in the building because there are a lot of parts to paint and put on. For the metallic effect in the shock absorber I again used BARE METAL FOIL. While we are in the fork, we must slightly open the holes for the front shock absorber so we won't scratch the foil while we install them through the holes, during the final assembly. Then we must paint and assemble the front wheel like we did with the rear one. After finishing all the painting and assembling, we must install the brake cables and hoses included in the kit; they are a lot and we must be very patient and careful for not to make mistakes with the placement of each one of them. For this purpose you an replace the vinyl hoses that come with the kit, with black electronic wire, it is thinner and look a lot better, plus they don't kink in the bending and curves.
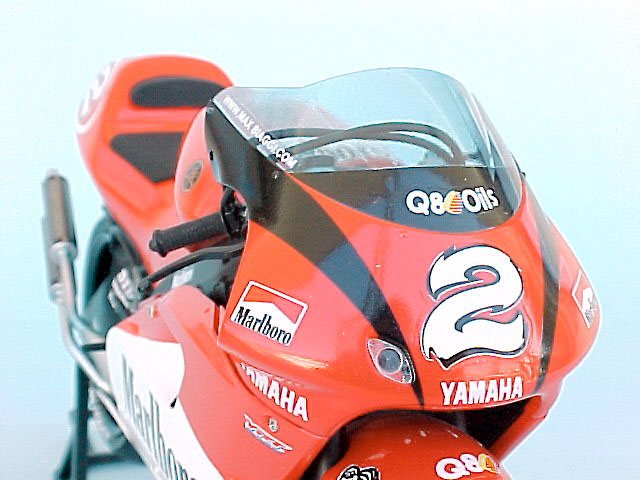
Step 8 In this step we will install the front mudguard before putting the wheel. This part comprises two parts that we must glue, putty the joint, and sand very carefully because the plastic here is very thin. We must paint and decal this part before putting it in the fork. You can mix the paint in the right shade for the mudguard and the cowl because they both have the same color. For this task I used Tamiya's white and red acrylic paints which are the ones for the Marlboro version. For the Marlboro red I mixed 9 parts red (X-7) and 1 part lemon yellow (X-8), in order to make it a little "livelier". This same color, although with a little more yellow, is good for the Antena 3 version. For the Red Bull, I mixed 50% metallic blue (X-13) and 50% blue (X-4). After gluing the mudguard in its place, I installed the front wheel taking care not to scratch the brake disks, and checking the wheel rotation direction. Besides that, I would recommend not to tighten too much the screw that holds the wheel in place.
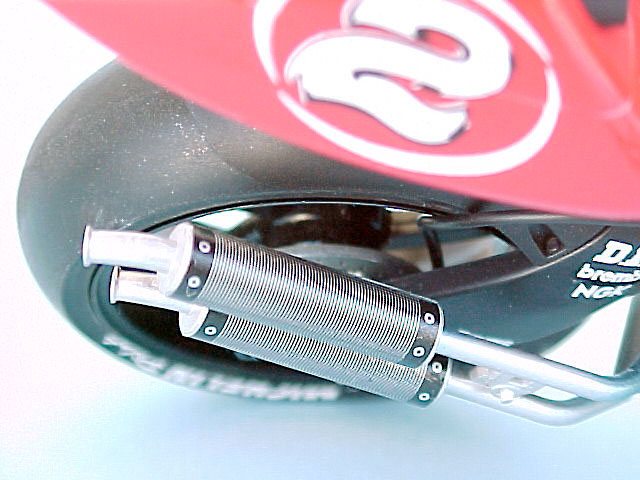
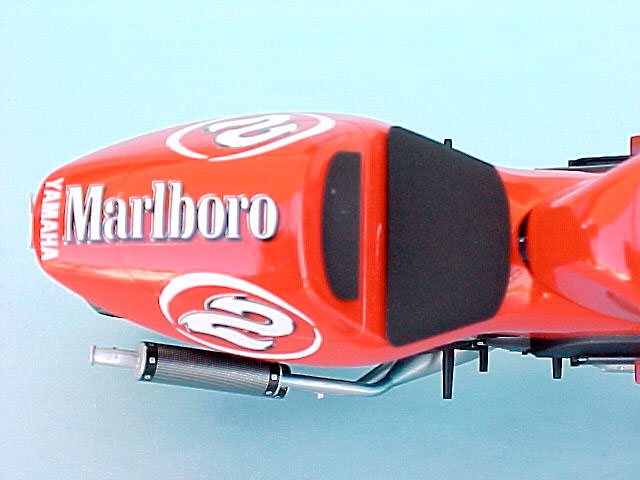
Steps 9 & 10 In these two steps we will assemble two of the four exhaust tubes. Assembling these parts is not difficult, although you must scrape the joint line very carefully with the back of an #11 X-acto blade, finishing all with very fine wet sanding paper. The hard part comes with the painting of these parts. First of all, we must keep in mind the extremely high temperatures that these parts are subject to; these temperatures create a varied range of blues and oranges. In order to achieve these shades I started painting the whole part with aluminum color as a base, then I used transparent colors and an air brush putting on coats, beginning with the lighter ones and finishing with the darker tones. The first color was clear orange (X-26) near the exhaust zone, and after that I applied the clear blue (X-23) closer to the engine.
Step 11 This step shows how to assemble the stand, the seat, and the rear cowl. The instruction leaflet shows the gear selector pedal and one of the two computers, although we prefer to add these two accessories in step 12.
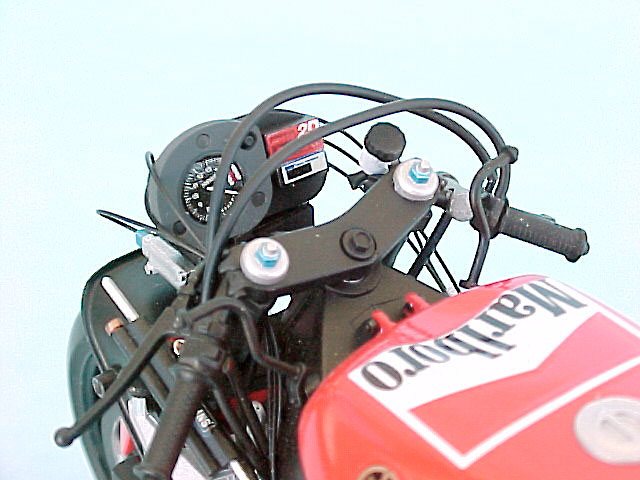
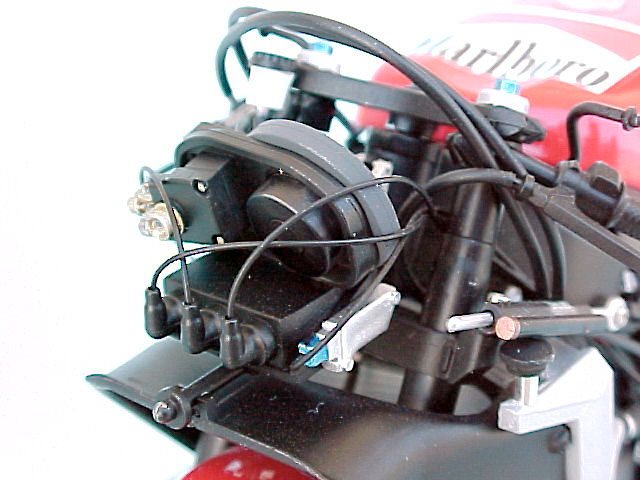
Step 12 In this step I installed the two remaining exhaust assemblies, the computer, and the gear changing pedal. Then, I added the other computer and detailed both of them with wiring not included in the kit. For that job I used small pieces of copper wire and fishing line, all painted in semi gloss black. This took care of all the electrical cables. Depending on the chosen version, we will use a different right pedal, here, we have two options: we can actuate the rear brake with the corresponding pedal, or we can actuate the brake by means of the left handlebar lever. Once that part was decided, I installed the instrument panel with the addition of three little pieces and the decals. This is a very delicate job because the parts are very small and there is a great deal of different colors.
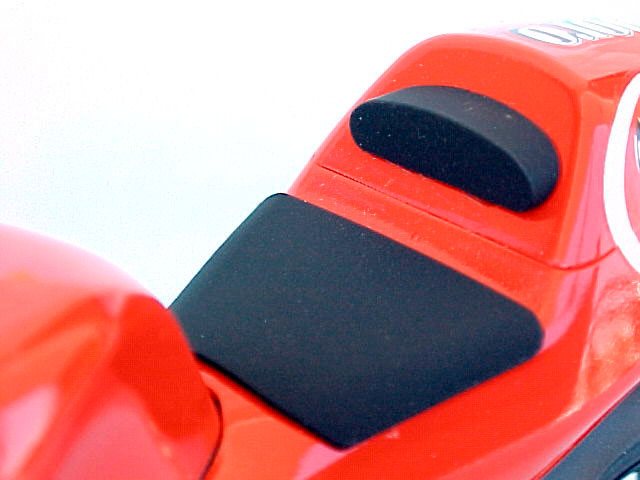
Steps 13,14,15 These are the last stages in the building of the kit and they all refer to the painting and decal positioning as well as the installation of the firings. If you opt for the Marlboro version, as I did, the painting is quite simple. I used white as the base color, then I made a triangle with masking tape for the Marlboro logo, and painted red with the paint I prepared in step 8. Remember that the Marlboro cowling does not have the little wings, like in the Red Bull and Antena 3 versions, so we have to plug the tiny holes for these ailerons with a little putty, and sand everything before priming and painting.
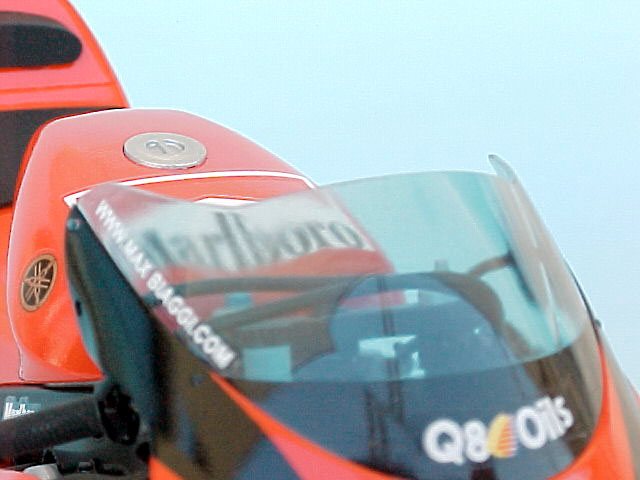
After that I assembled the fuel tank, puttied the central joint and sanded everything with wet sanding paper (400 first and 600 for the finish). After that, I installed the windshield; before installing, I painted it with a very diluted coat of clear blue and once the blue dried I applied a coat of smoke color (X-19). To finish all that, I installed all the fairing VERY CAREFULLY.
Conclusion
This is how I built the YAMAHA MARLBORO TEAM YZR500; I hope these notes will be helpful for anyone, specially the novice, attempting to build this or any other motorcycle model. Remember that no matter the detailing level you want for your model, the most important part is to have fun because after all, this is our hobby's main purpose.
|
|||||||||||||||||||||||||||||||||||||||||||||