|
|
||||||||||||||
|
Armor/Diorama |
|
|||||||||||||
|
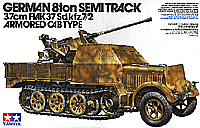
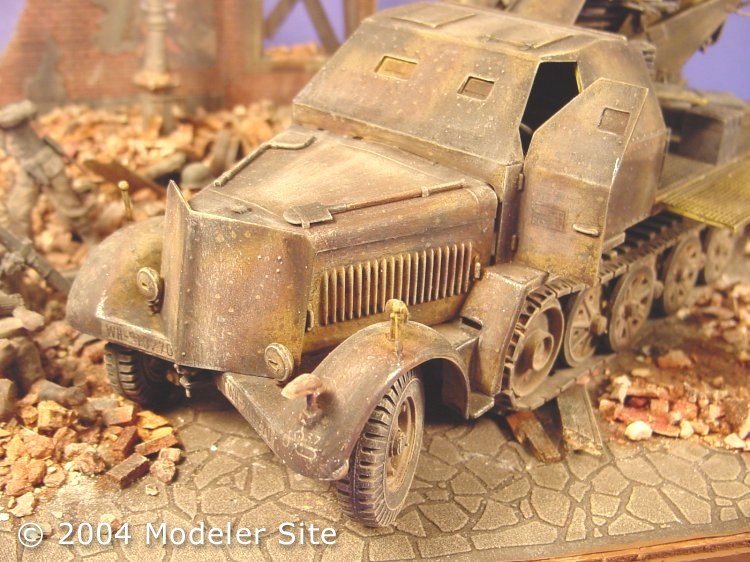
German Sd.Kfz7/2 8-ton Half-Track w/Flak 37 Diorama Tamiya 1/35 scale |
||||||||||||||
|
by Kelly Zak © 2004 Modeler Site |
||||||||||||||
|
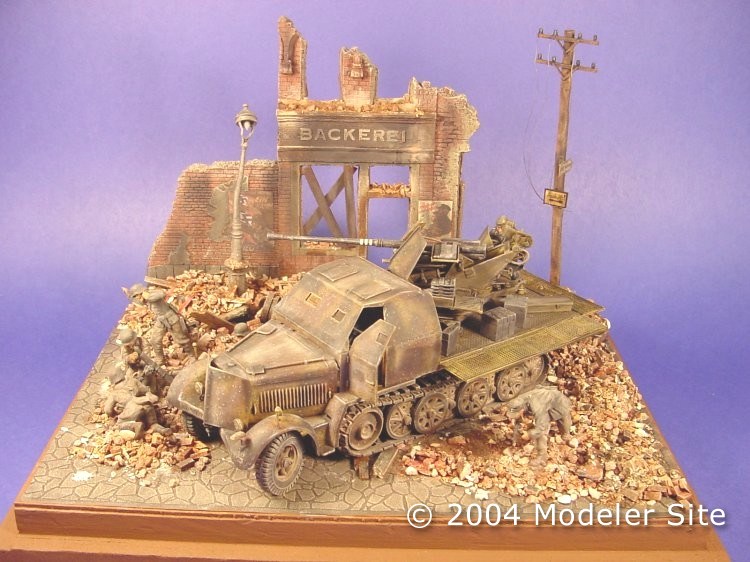
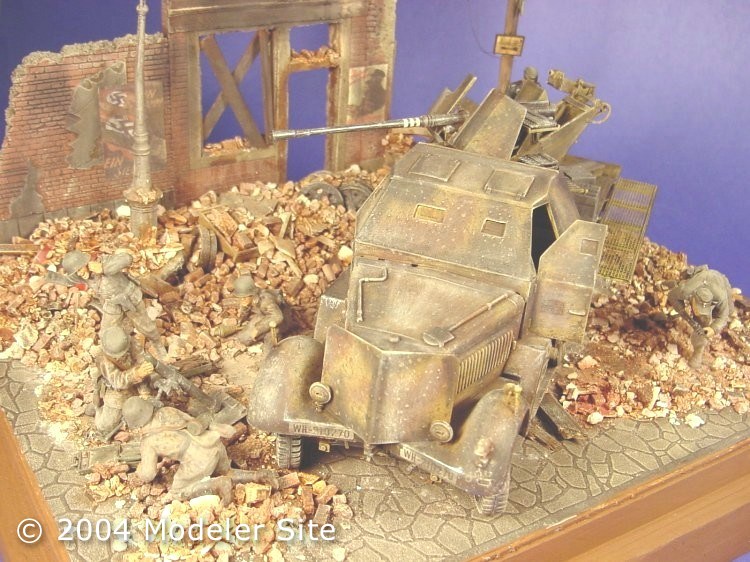
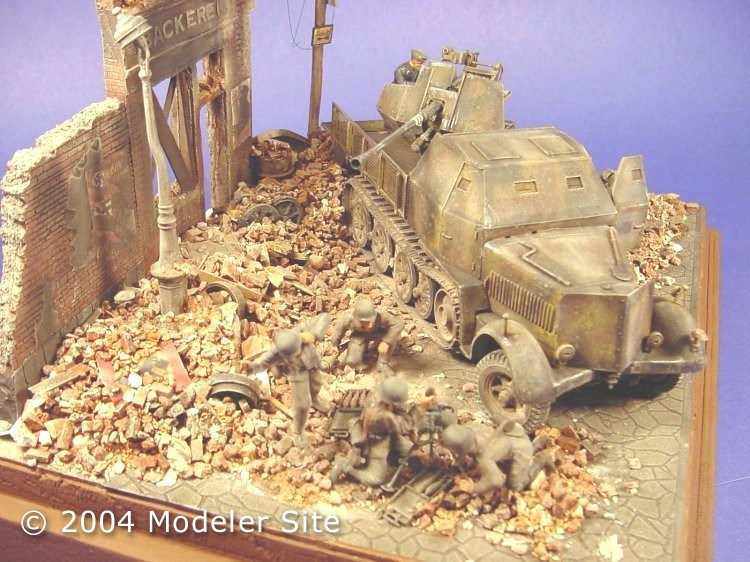
Legal Notice No material from Modeler Site any Web site owned, operated, licensed, or controlled by Mario Covalski & Associated may be copied, reproduced, republished, uploaded, posted, transmitted, or distributed in any way, except that you may download one copy of the materials on any single computer for your personal, non-commercial home use only, provided you keep intact all copyright and other proprietary notices. Modification of the materials or use of the materials for any other purpose is a violation of Mario Covalski & Associated's copyright and other proprietary rights. Read More here > Legal notice Hello boys and girls, it’s diorama time again! This time I have created a diorama entitled “Last Days”. It’s a scene that was seen all too well in cities in Germany during the last month or so during World War 2. Berlin, especially, was reduced to nothing but a pile of burned, charred rubble, and as Hitler hid in his underground bunker in Berlin as the Russian Army approached, the German solider still fought on, house to house, street by street, knowing full well that it was only a matter of time before capitulation. The diorama depicts a ruined German bakery, and an Sdkfz 7/2 Armoured cab with a 37mm Flak 37 anti-aircraft gun.
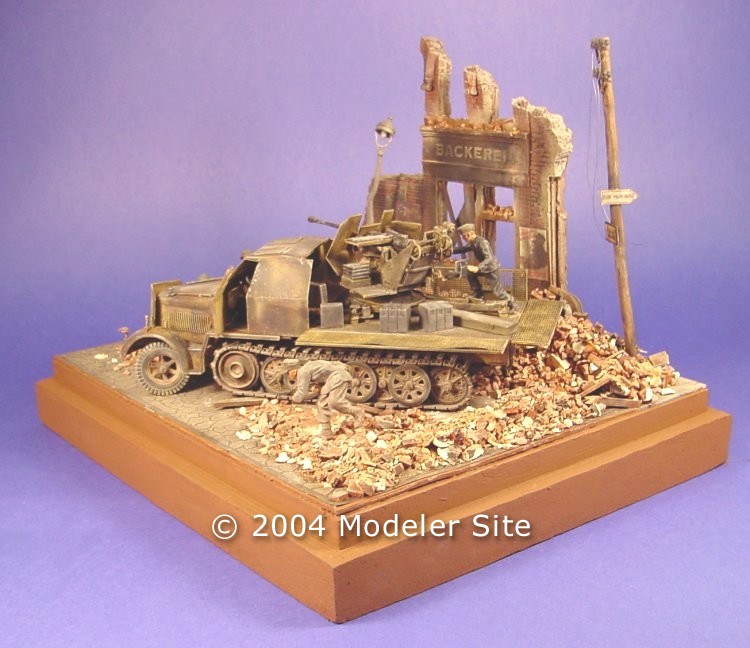
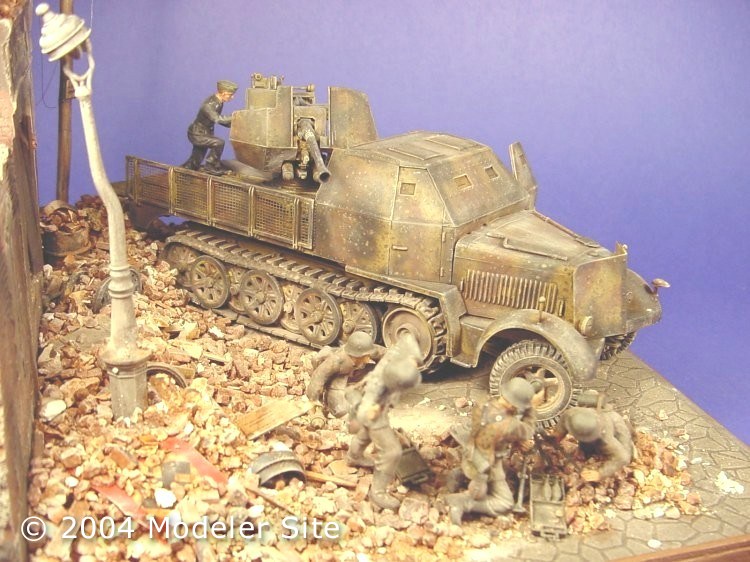
The model A brief History: The majority of these vehicles were built by Krauss-Maffel, Borgward, and after 1943, by Saurer. A special superstructure was built to support the Flak 37, for all around traverse when the sides were dropped down. A special trailer was made to carry the ammunition. After 1943, the cab, along with the engine compartment were lightly armoured. These vehicles were issued to Flak units of the Luftwaffe.
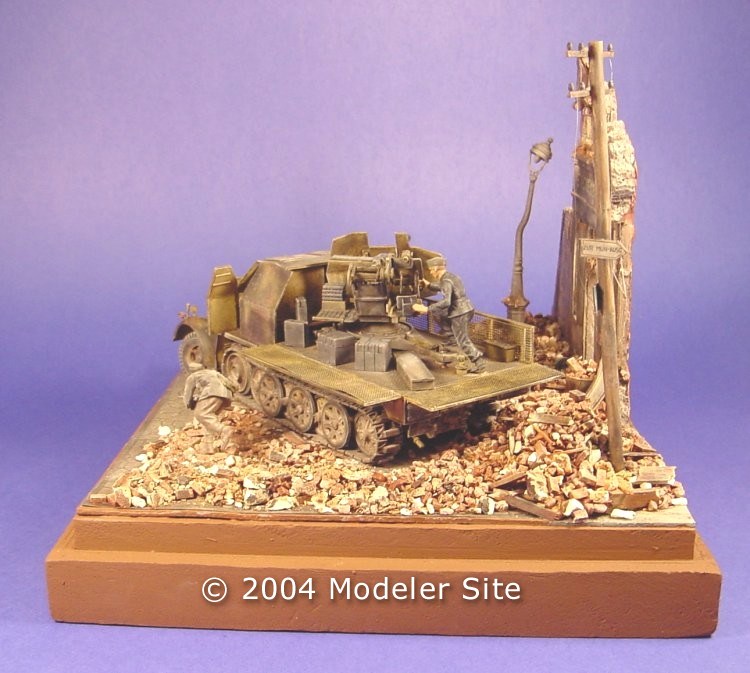
First up is the construction of the lower hull. With this kit, and the way it’s constructed, I ended up painting the whole vehicle by hand, which did get a bit tedious after a while. The lower hull went together without problem, and the running gear was next up. The track wheels were painted with a German Yellow, blended from various artist craft paints. I was not concerned with the exact shade, as I would be severely weathering the vehicle, and the shade would change. After the track wheels were assembled and attached, I constructed the front axle portion, leaving off the tires until later. In this kit, Tamiya have provided vinyl tires, instead of solid plastic ones, and they were very well detailed.
Next up was the armoured cab. There is an interior for the kit, and it is not very detailed. No matter, most of the interior would be hidden for the build I wanted to do. There is an option for either open or closed doors, I chose to leave the driver side open for the dio part of the build (more on that in a bit). I painted the bench seat with Vallejo #821, German WWII Beige Camouflage. This is the first time trying these paints, and they are probably one of the best paints I’ve ever used. Awesome pigments, and only one coat was needed. As the interior was finished, I quickly weathered it up using a wash of a brown/black artist oils, later drybrushed and a quick dusting of black and white pastels to simulate a well used cab. The cab portion of the cab was constructed and attached to the chassis. At this time, I added my oil wash to the whole chassis, underside, and front axle. Later I drybrushed the high points, and that was all that was needed. The vehicle would not be viewed from underneath too much, so I did not do too much detailing. The rest of the vehicle was constructed and painted with my German Yellow mix.
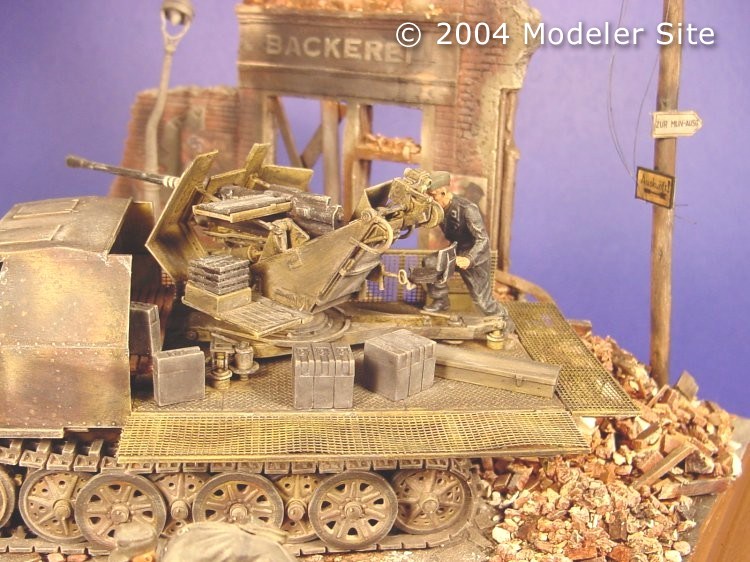
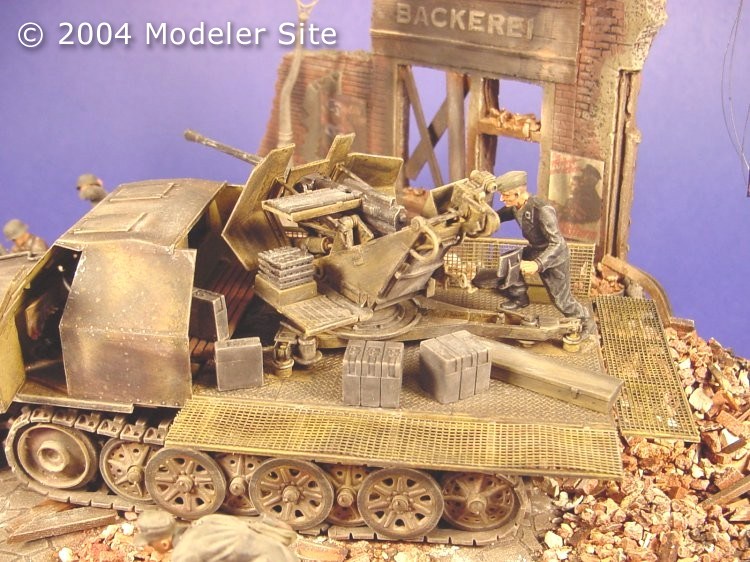
Flak 37 This is a kit in itself! Very well detailed, although a little fit problems here and there, it was a breeze to assemble. Again the whole gun received German Yellow paint, and the gun portion and magazines received a coat of Humbrol Gun Metal enamel. This is a great paint to use, it’s the closest thing to actual gun metal I’ve seen. It goes on really blackish, but after a quick buff with a cotton swab, the colour appears. The tracks for the kit were painted, and attached. Being the “rubber band” type, they fit great, not really tight like some of Tamiya’s other vinyl tracks. Sag was produced by simply applying super glue to the tops of the road wheels and pressing the tracks down. Cammo time! With the vehicle assembled and painted, I dug out my airbrush, and started applying Tamiya XF-64 Red Brown and XF-61 Dark Green and gave the whole vehicle large cammo patterns. After this was completed, I decided that I would give the vehicle a late-war Ambush scheme. I could not find any photos of the vehicle with this type of pattern, so I do not know if this is correct. I just chalk it up to crew preference, a lot of the time, anything went. Slap the paint on, and get out there! So I added the ambush dots to the vehicle, and the result was pretty good. But alas, this paint scheme can’t look like it’s new, so I added a wash of mixed black and burnt umber artist oils all over the vehicle, and flak gun. Once dried, I drybrushed with a sandstone acrylic paint, added chip marks with a silver pencil, and set it aside.
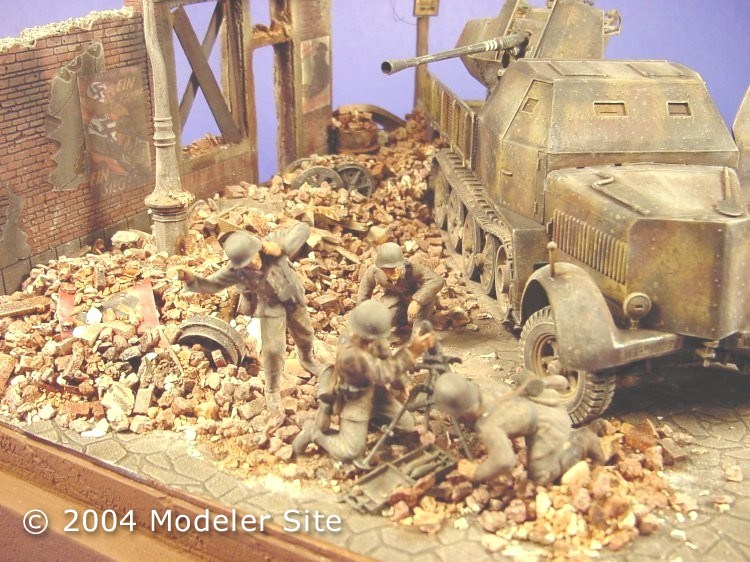
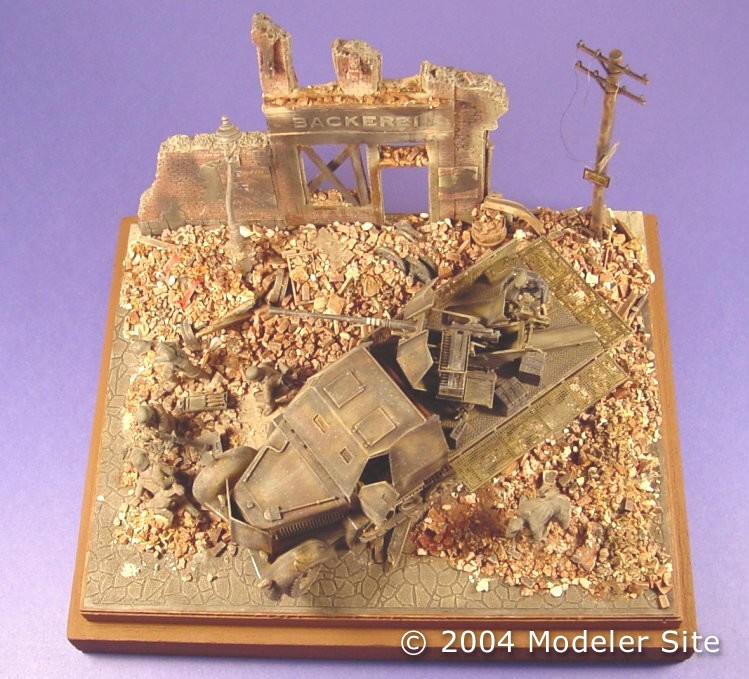
Diorama and base Ok, time to start the base for my setting! First off, let’s concentrate on the building. This building piece is the result of a casting experiment I tried with a Verlinden master building. I used liquid latex as the mold, and the piece turned out better than expected. For the diorama, I opted to just show the façade, with no interior or sides. It was simply painted with grey acrylics, Humbrol #70, and brown for the wooden support beam above the doorway. I found some confetti letters in a craft store, and they were the perfect size for store fronts. So I did a quick translation on the internet for the word Bakery, and after gluing on the letters, I had a ruined bakery! At the same time, I tried my hand at scratch building a small ruined wall section. This was done by taking a section of plaster that I normally reserve for turning into rubble, and taking a motor tool, roughed out the outer edges. I drew out where the exposed cement skin would be, and routed out the remainder of the area so I could scribe in the brickwork. The base was constructed by cutting a piece of insulation board, which is basically really dense Styrofoam. I found a new product from Tamiya, although I haven’t seen it in their catalogues, or website. They are 8x11 sheets of road sections, and they come in a variety of designs. I used a paving stone design, and it was glued to the base. At this time I added the building pieces to the base as well. To close up the window, I simply added some pieces of coffee stir sticks to simulate boards. The building pieces received a oil wash, and drybrushed, and pastels were added here and there for a more beaten look.
Rubble and extras Ok, with the building sections glued down, and the roadwork weathered slightly, it’s time to start laying down some rubble. I gathered my usual materials for making rubble: Smashed bits of plaster, broken bits of painted wood, rail ballast. I also added some newer products this time. Red bricks that are made from cork board, and some “brick coloured” gravel, from Lemax were thrown into my mixing jar, and vigorously mixed. Before I added the rubble, I added a light standard and telephone pole from Tamiya. The rubble was then added to the base, and arranged into the way I wanted it to look. Before the gluing process, I added some pieces of another halftrack from the junk spares box. This was the front axle (which I bent, and severely distorted with a lighter), and a section of the drivetrain. A barrel was added, an ammo box and a twisted I-beam. At this time I was deciding whether or not to add The National Socialist Flag to the scene. After long thought, I decided to add it to the scene, but amongst the rubble, as a symbol of that, the “Thousand Year Reich” was at its end, and lay in ruins. Everything took a couple of sessions of gluing to fully cure and harden. Now the weathering process. I added two types of washes to the base, one being my brown/black wash to certain areas, and the other a mix of burnt umber and burnt sienna. This was followed by heavy drybrushing with a sandstone colour. The halftrack was added at this time, and for extra weathering, I added MiG Weathering Pigments Brick Dust here and there, and on the lower half of the halftrack for extra detail.
Figures The figures I used are a mix of Tamiya, Verlinden, and Italeri. The Tamiya figures are the German Mortar Team, and they are very well detailed. The only addition/change made to them was the addition of equipment straps made from masking tape, and the uniforms were painted a mix of pea patterns and field grey. The Italeri figure is from the German Tank Crew set, but modified to act as the halftrack driver/gunner. The Verlinden figure was my first resin figure, and I did not know what to expect going into assembly of it. I was pleasantly surprised on the ease of assembly, and the amount of detail. The only issue I have with the figures, is that they are a little on the large side, but while presented beside an older Tamiya figure, the size is pretty much the same. But that’s just nitpicking. Once the figures were glued down after weathering, I gave them a dusting of the brick dust from MiG, to really dirty them up.
Conclusion So that’s it, my “Last Days” diorama…I really enjoyed doing this piece, and the attempt at home casting really added to the scene, as well as the introduction of newer products. I hope you enjoy the piece!
Support us ordering our notes in PDF > Here |
||||||||||||||