|
|
|||||||
|
Techniques |
|
||||||
|
Working with Alclad2 "natural metal finishes" |
|||||||
|
by Mario Covalski © 2008 Modeler Site |
|||||||
|
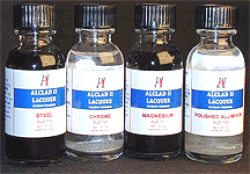
Legal Notice No material from Modeler Site any Web site owned, operated, licensed, or controlled by Damian Covalski may be copied, reproduced, republished, uploaded, posted, transmitted, or distributed in any way, except that you may download one copy of the materials on any single computer for your personal, non-commercial home use only, provided you keep intact all copyright and other proprietary notices. Modification of the materials or use of the materials for any other purpose is a violation of Damian Covalski's copyright and other proprietary rights. Read More here > Legal notice The basic goal of every modeler is to represent reality in scale, to every possible extent. First of all, by trying to reproduce the shape of the real subjects and then, trying to reproduce their real colors. About 40 years ago, the construction of a 1/72 Spitfire meant copying its shape and trying to find the appropriate brown and green colors. At that time I used …. Humbrol paints, yes they already existed and had a very limited range of colors. Just 25 years ago, the first FS and RLM appeared. In this way, you managed to get "something" similar to reality. When the time came to paint the shock absorbers or the propellers, the young modelers used the 11 … SILVER, yes, simply silver, there was no other option at hand (there were brands like Pactra which provided a good aluminum). Even 20 years ago, there were just a few alternatives for modeling in plastic, silver, aluminum, gold, copper … and maybe brass. There was a time when it was a common practice to cover the plastic with aluminum foil, in this way we could see planes covered with this foil and having a good metal finish. Metal Paints I am not quite sure but I think it was by the end of the 80's when some small manufacturers started offering products that seemed to be miraculous and functioned in different ways, like paint, or powder to be applied, etc (like SnJ, etc) Some paint brands like Tamiya have been offering us for a number of years now a series of metal colors, which although not absolutely real, have very fine grains (enamels, not acrylics) that allow us to obtain a quite realistic finish. Then there appeared the Testors and Humbrol "metalizers", which made a difference if compared to ordinary products, and later on the "polishing" paints, which were metal paints that needed subsequent polishing and are nowadays still in use. Modelers always wish to represent reality, and the hardest part of this job is when reality is a polished material, or new technology metals, like titanium/grey and titanium/gold. Alclad2 About two years ago I heard about Alclad2. I remembered that name Alclad, but Alclad 2 is not the same product and has nothing to do with the previous one. Through the articles written by Tony Allen I came to know about the results he obtained with this paint, they seemed to be very good, but seeing something is not the same as trying it. Some months ago, Tony sent me a couple of bottles of Alclad2: the "High Polishing Aluminum, HPA" and the "Pale Gold, PG" - for me to try. I was at that time building a 1:12 Tamiya Renault turbo and decided to paint its rear aileron and its wheels with this new product. Unfortunately, since I was not an expert in the use of this paint, one bottle was not enough ( I wasted a lot of paint, I will explain this later), so I had to paint the front aileron using my previous technique: apply Testor chrome silver on a very well polished surface. Using Alclad2 paints I am not an experienced user of Alclad2. Therefore I will make some comments on the use of this paint, with the usual success and mistakes of someone who uses them for the first time, trying to reflect my feelings and some small tricks I discovered, that were already indicated by Alclad2 but you come to understand them once you use the product.
The first thing that attracts our attention is the high content of thinner. With Tamiya or Testor we usually have 50% paint and 50% thinner (approximately). Alclad2 has approximately a 80-90% of thinner, which means that we must either shake the bottle conveniently and use a glass with small quantities of paint, or continuously shake the paint in the siphon of the airbrush. This is a common practice for all paints, but especially used when the percentage of thinner is high.
Alclad recommends: In general, for all metal shades:
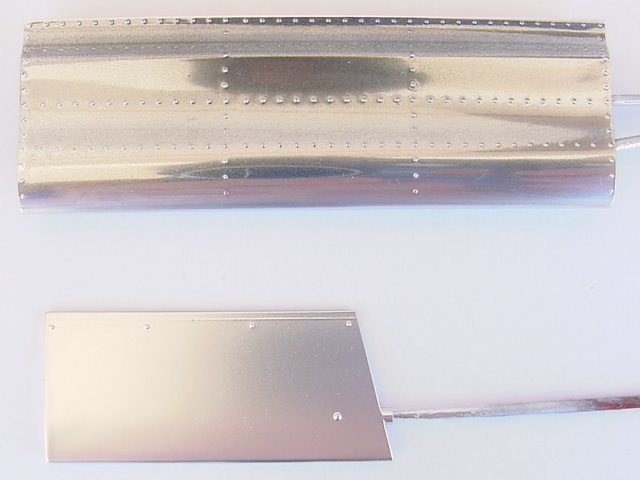
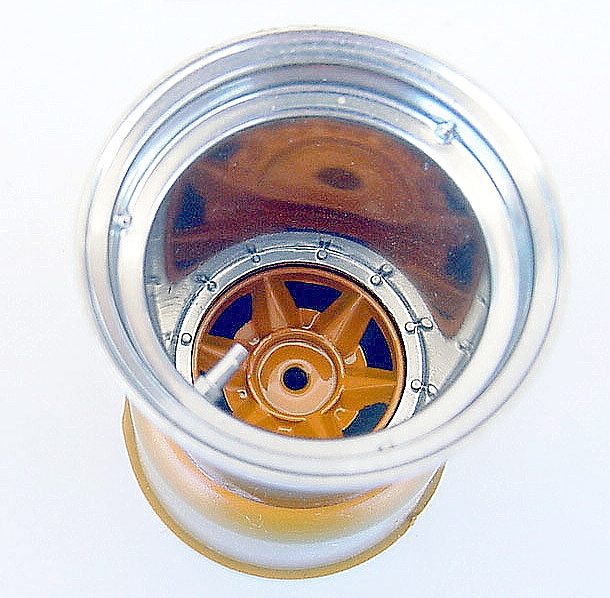
For high shine colors like chrome or polished aluminum: Chromed parts The wheels and ailerons of the Tamiya's Renault were chromed parts. I removed the metal color with a solution of ferric chloride (used to manufacture printed circuits, in electronic devices). All chrome parts have a very glossy and very thick polyurethane varnish, which provides a smooth enough surface for the application of Alclad2. In addition to it, the plastic of the wheels is black, for which reason I did not use any base paint and applied instead HPA directly.
I started painting the rear aileron but I had a problem due to my lack of experience with Alclad2 ….. the excess of paint. A word about airbrushes You could need different kinds of airbrushes for different jobs. An airbrush used to paint a 1:12 body is not recommended for a small part or for detailing a 1/72 plane. As you may already know, every airbrush has distinctive features like, internal or external mix, double or simple action, size of its head, paint load due to gravity or siphon. etc. I generally use a Badger 200 (simple action) with big head to spray over big areas at a high pressure (approx. 30 lbs), like in the case of a 1:12 body. I have another 200 with a small head (so as to avoid continuous disassembly) for small parts, which requires little clean-up because it is not used for bodies. And finally a 150 (double action) with a medium head for details, shadows, etc. (like the details on an exhaust tube, or a camouflage without masking). It is very useful to use the proper airbrush for each situation. However, when you purchase a new airbrush you usually get one with a medium head, with the exception of those having interchangeable heads. For the painting of the aileron of the Renault I used the # 200 with a big head. Although I shut the needle and applied the recommended pressure (13 lbrs), the flow of paint was excessive, it consumed a lot of paint and left some dust on the surface, which quickly turned opaque and spoiled the metal finish effect.
The Future of Alclad2 I made a test for this review, I painted one part with Alclad2 PG and the same part (a resin brake disc) with a mix of Tamiya's gold + silver. The final result is very similar.
Disadvantages Maybe the only drawback of Alclad2 is the need to apply a base coat on all polystyrene parts, (anyway you will always have to do this with resin and metal parts). However, with a little bit of practice and a proper paint mix, this won't be a problem at all. For large parts having a complex shape, like a chassis, I recommend the use of an airbrush with a small head, maybe a double action one if you know how to use it. In this way, we could better control the application of the base paint. After this stage, the application of Alclad2 will be no problem. The price of each bottle is reasonable, if we take into account that we have to paint with low pressure and closed needle (since I am not an expert I used much more paint than needed, because I am used to work with Tamiya that can be used less thinned). Conclusion I think that extremes are no good, I mean, if you are successfully using a special type or brand of paint, you don't have to throw them away and buy Alclad2. However, the advantages of Alclad2 over other metal paints are significant. I decided to gradually change my "habits", replacing Tamiya (and its associated technique) with Alclad2, especially on the most difficult areas, like polished aluminum and chrome. The advantages are remarkable for car and motorcycle chassis and plane fuselages. We can paint and then handle these parts for a long time without fearing any paint lifts (the resistance of HPA is really unbelievable).
Do you want to read more about Alclad2? > F.A.Q |
|||||||