|
|
|||||||||||||||||||||||||||||||||||||||||||
|
Cars |
|
||||||||||||||||||||||||||||||||||||||||||
|
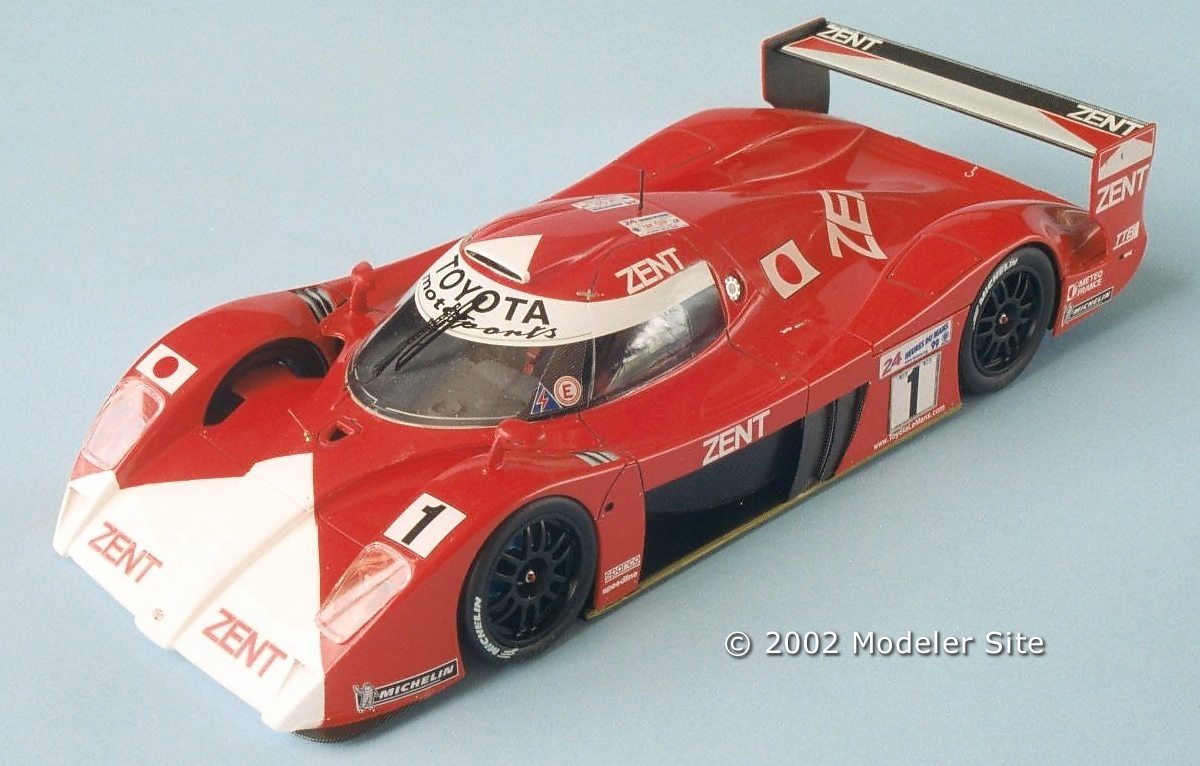
Tamiya's Toyota GT One TS020 1/24 scale |
|||||||||||||||||||||||||||||||||||||||||||
|
by Paul Adams © 2009 Modeler Site |
|||||||||||||||||||||||||||||||||||||||||||
|
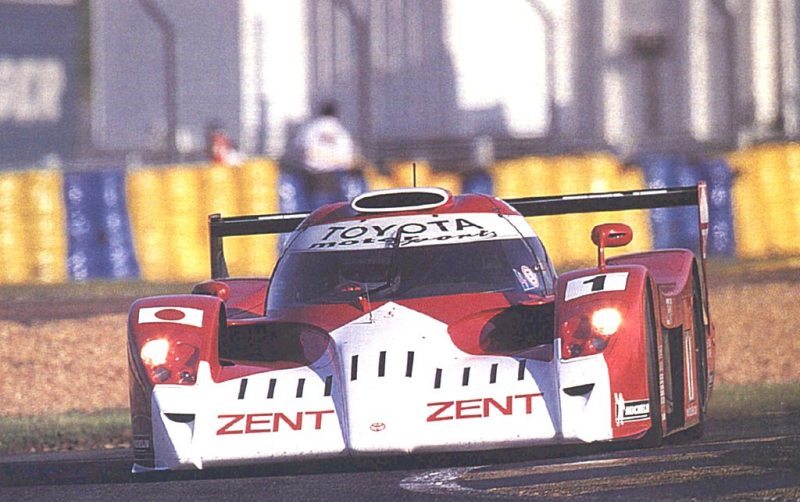
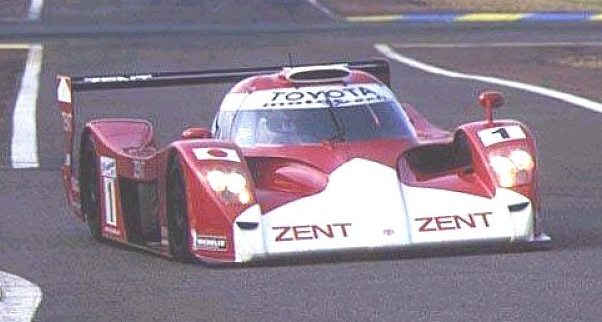
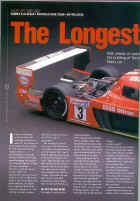
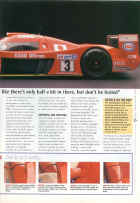
Legal Notice No material from Modeler Site any Web site owned, operated, licensed, or controlled by Mario Covalski & Associated may be copied, reproduced, republished, uploaded, posted, transmitted, or distributed in any way, except that you may download one copy of the materials on any single computer for your personal, non-commercial home use only, provided you keep intact all copyright and other proprietary notices. Modification of the materials or use of the materials for any other purpose is a violation of Mario Covalski & Associated's copyright and other proprietary rights. Read More here > Legal notice The 1999 Le Mans 24 Hours was for the first time in years supported by several works teams including Audi, Panoz, Nissan, BMW and of course Mercedes and Toyota, back for their second attempt in two years, entering 3 cars. However the race will always be remembered for the spectacular exit of the works Mercedes CLR sportscar. With Peter Dumbreck at the wheel of the #5 car, the car somersaulted at 200mph on the Mulsanne Straight prompting the withdrawal of their remaining car after just 5 hours. At the time of the accident the car in front of the Mercedes was…..a Toyota! For me however, the enduring memory of the race was watching Martin Brundle's desperate attempt to get his stricken Toyota back to the pits for repairs following a puncture induced crash at the first Mulsanne chicane after 8 hours. All was in vain however, as the damaged machine could only be coaxed as far as Arnage before grinding to a halt. Brundle stood with the car for several minutes, contemplating his lost Le Mans dream once again. For the record, the #2 car crashed out after 11 hours and car #3 narrowly missed winning due to yet another puncture after 23 hours.
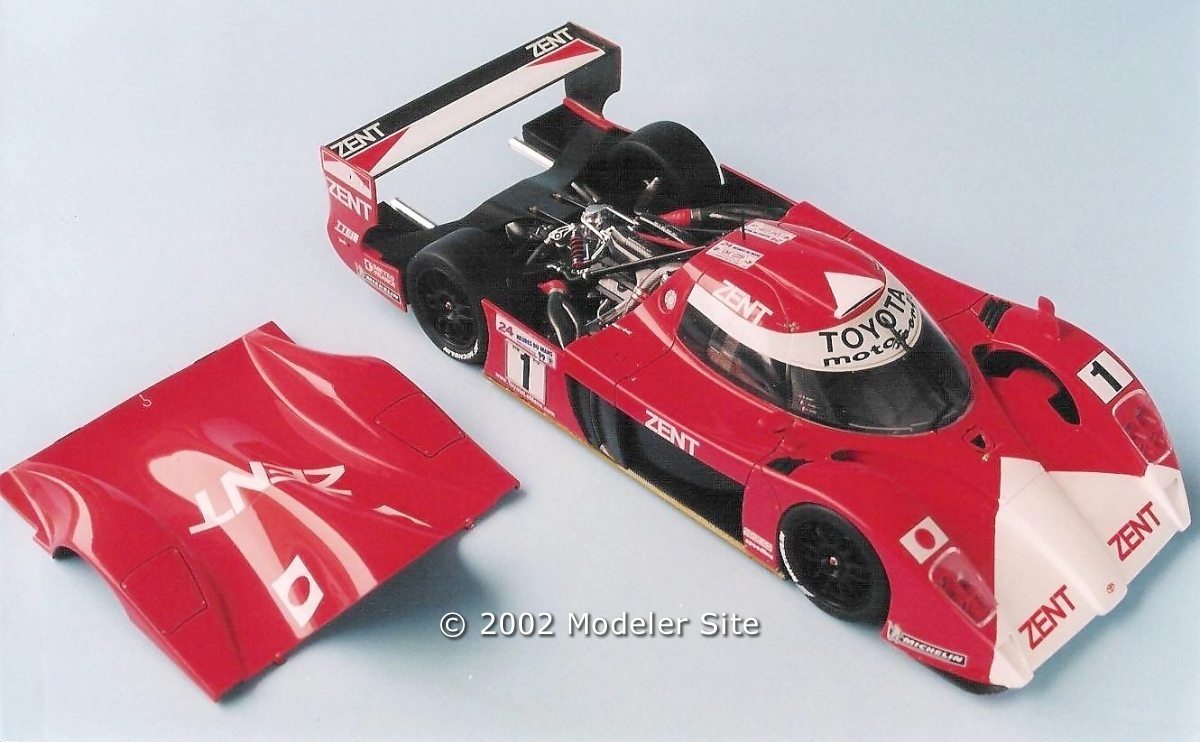
The kit The kit is presented in Tamiya's usual fashion, beautifully package, and almost too good to open! The bodyshell is moulded in white, making painting easier, the chassis and engine parts are in black. Also included is a very nice chrome plated sprue featuring parts for the engine, cooling system, turbo and exhaust. Tamiya also include the very handy paint masks and a comprehensive decal sheet, that will allow you to make cars #1 ( Brundle/Collard/Sospiri), and #3(Katayama/Suzuki/Tsuchiya ). I believe aftermarket decals are available to do the #2 car (Boutsen/Mcnish/Kelleners). After some nights of deliberation, I decided to enhance the kit with Studio 27's photo etch kit and Scale Motorsport's templated carbon decal kit, but also adding decal to the engine parts too.. I had used carbon decal before, though only on small parts, so this was going to be a real challenge! The paint corrections/ Refs
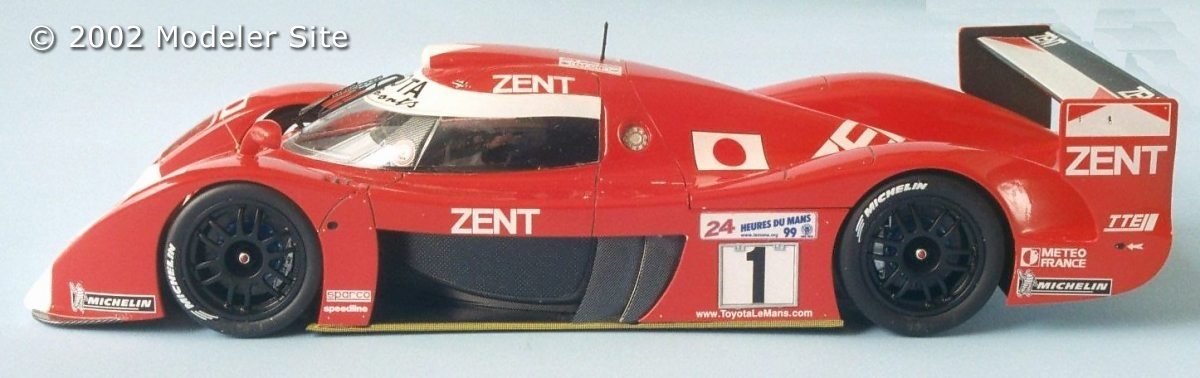
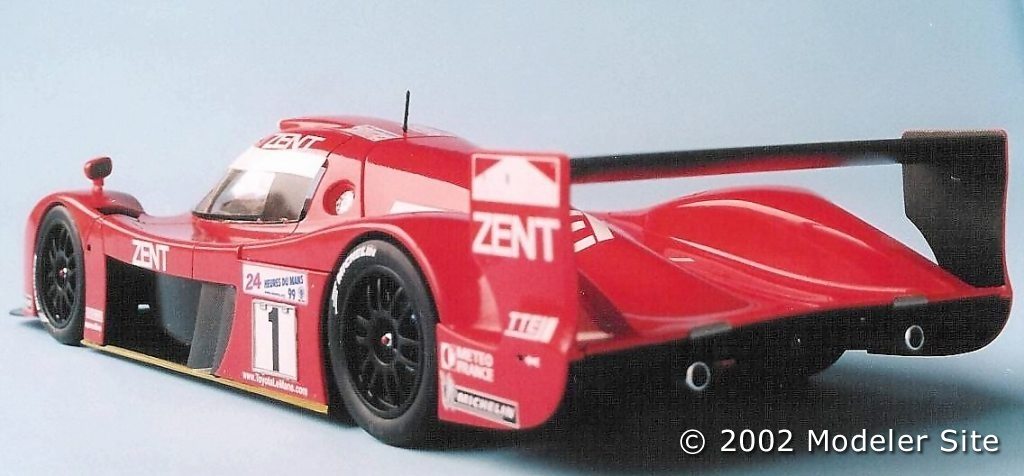
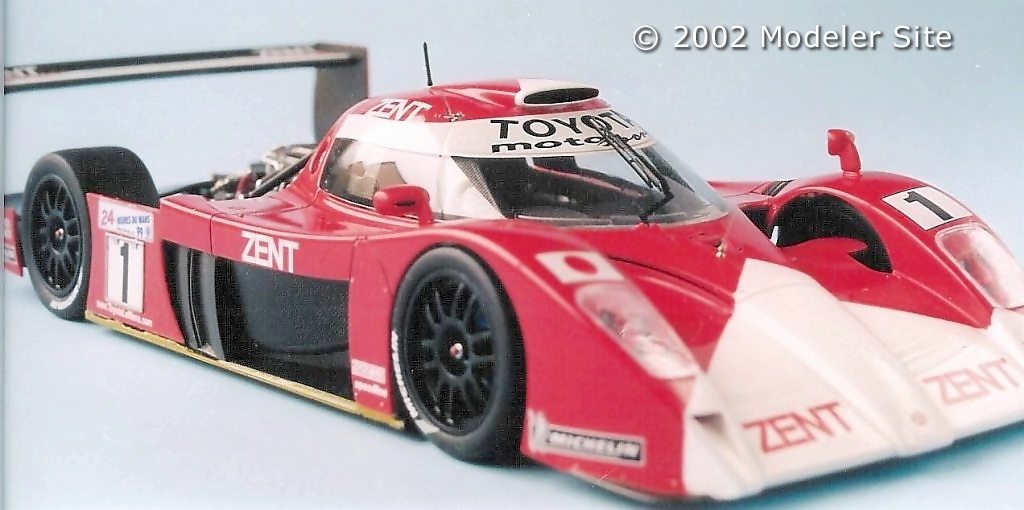
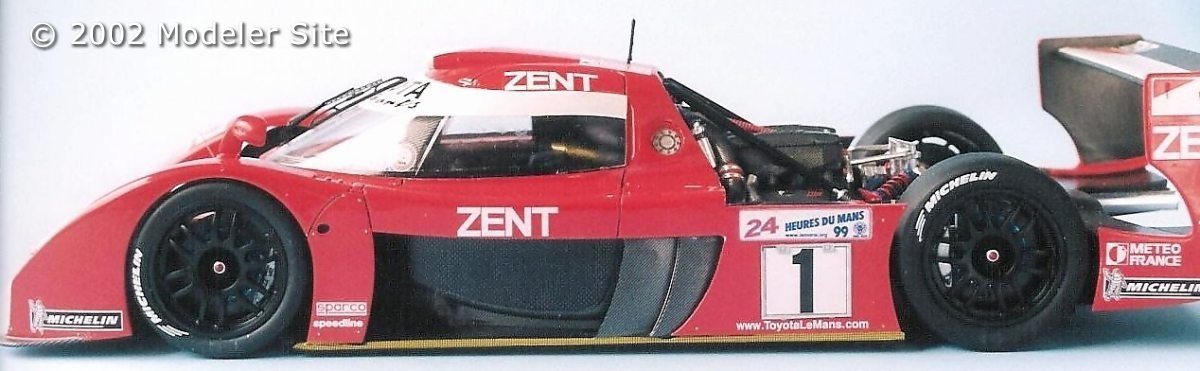
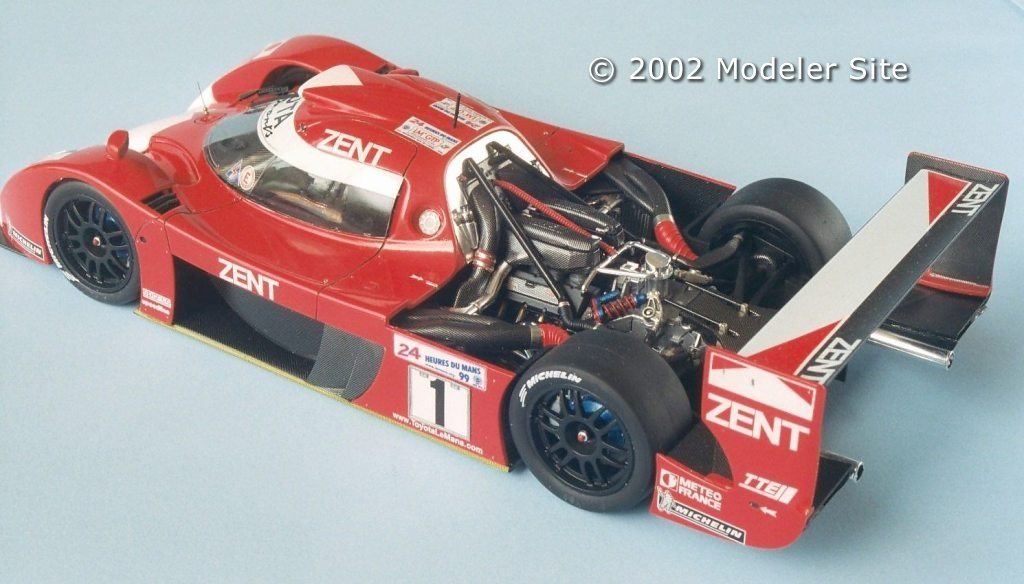
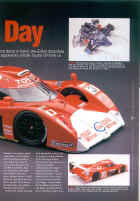
The footage proved priceless as the cars had featured so heavily in the race, there, was plenty of pit road scenes in which most angles of the car were shown. What became apparent was that Tamiya's painting instructions for the 'Marlboroesque' paint job contained some inaccuracies. In the kit you will find some pre cut masks, two of which are not mentioned in the instructions. The two triangular shaped pieces are in fact to build the correct scheme for Le Mans cars, in addition there are 6 red triangles on the decal sheet, again not clearly stated as for their use, which will help to correct the scheme further. The triangular mask help form the 'V' for the white colour on the nose and roof vent, the 6 decals are for the rear wing end plates and wing itself. Their effect can clearly be seen in the accompanying photos. In general Tamiya's suggested locations for the markings are accurate for the #1 and #3 cars The build / Bodyshell
The air intake above the cockpit was glued into position and filled. This part should appear as one with the body not separate as suggested in the instructions. I also added the small plates that sit beneath the front headlamps and filled these in. Last to go on were the small infill panels that provide aerodynamic aid over the front suspension.
Without masking, I then painted the sections that were to be white on the finished model using Halfords Appliance Gloss White. Four days later, I then polished the white areas using T-Cut, and achieved a pleasing finish. Now the tricky bit!! I used the masks to blank off the white areas by first applying the air intake rectangular piece as shown in the instructions. You will see that it has a shaded area that shows the position on which you then place the 'V' (which also has a shaded area).
The masks are very good, but care must be taken as they are very sticky, so be sure you are happy with they're location before burnishing them down! So on with the red, Halfords Volkswagen Mars Red was the weapon of choice as it matches the red decals very well.
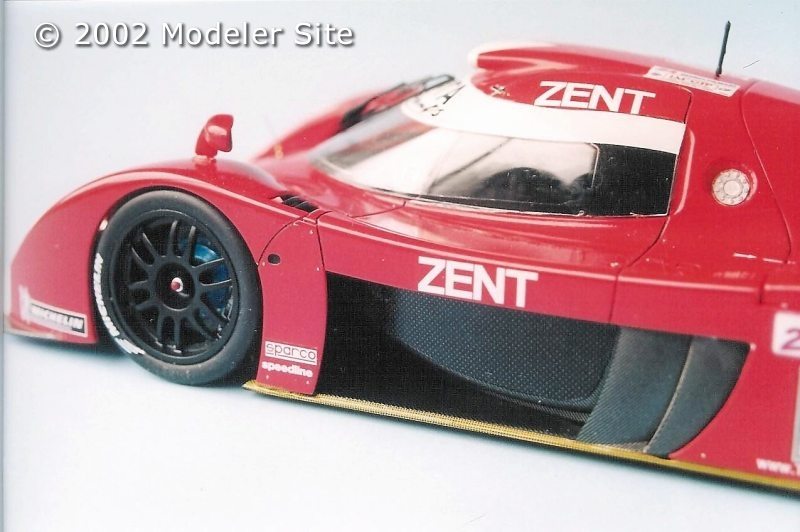
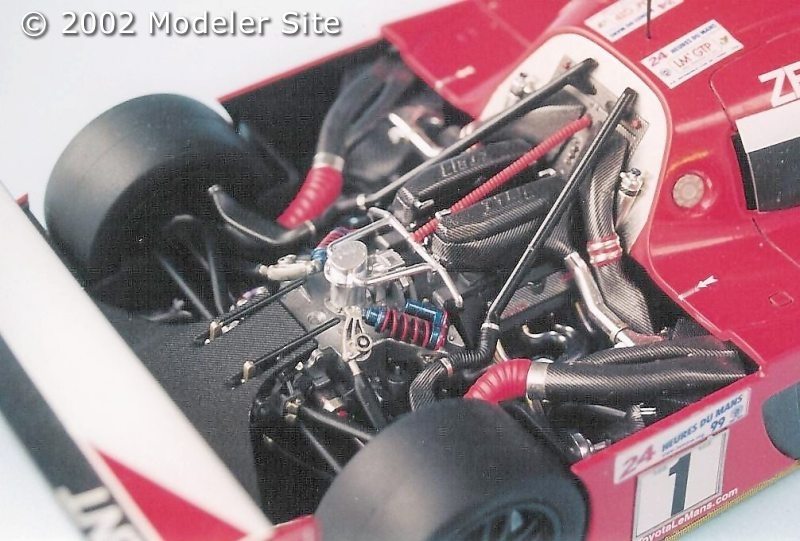
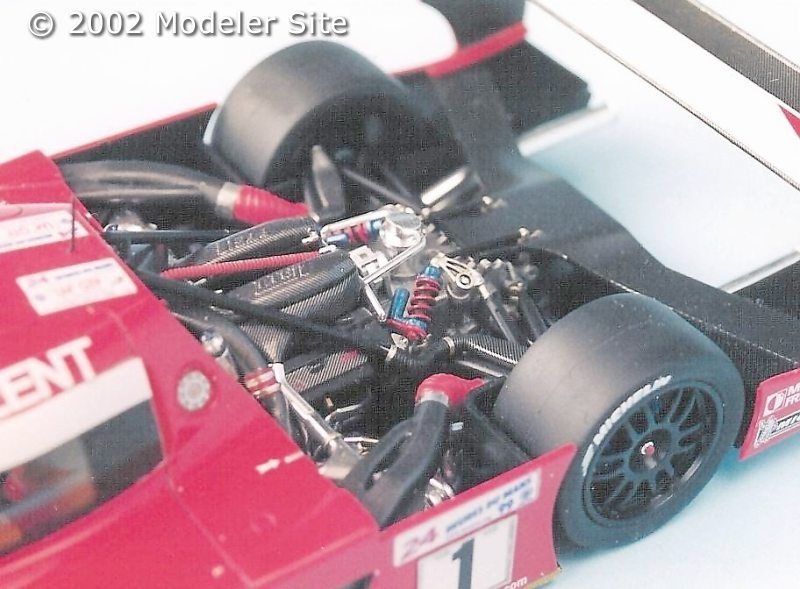
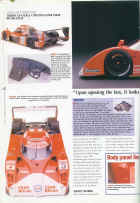
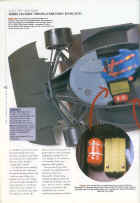
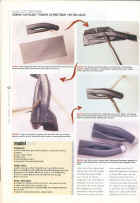
I applied this to the body, rear deck, and wing end plates, warmed in water, using four coats, one light, three wet, which were dried between coats using a hairdyer. Try not to use the wife's, get your own!! The masks were removed 2 hours after painting had finished to avoid the paint becoming too hard and cracking. Some bleeding had occurred but this would be sorted during polishing. Fours days later, and T-cut was again employed to smooth out the paint. The body is very fragile, so take care when doing this as the side panels bend easily! The areas where the paint had bled were tidied using some T-cut on a toothpick. After a few hours of hard work the body parts had a deep glossy red finish, - perfect for the decals to come. Chassis The chassis was cleaned up and sprayed Halfords semi gloss black, as were all the parts that were to be covered with carbon decal. This provided a good surface upon which the decals would go. The Scale Motorsports decal kit provides you with enough decal to cover the topside of the chassis, the interior doors and firewall, rear wing and support, the exterior of the doors and cockpit tub. The templates are indeed very accurate and only need careful application to give a realistic finish. After some advice from my model building friend, Dan ' The Oracle' Parratt (get yourself one they are very useful!), I proceeded with the decals. The application of these decals is probably best left to another article, suffice to say that you need to arm yourself with plenty of Microscale decal solution, a hairdryer, and gobs of patience, and you should do fine!
Following some experimentation I used the following method
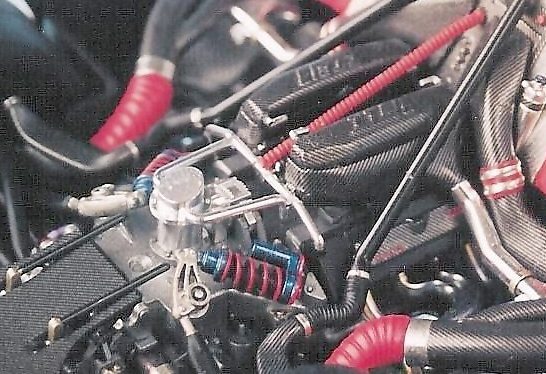
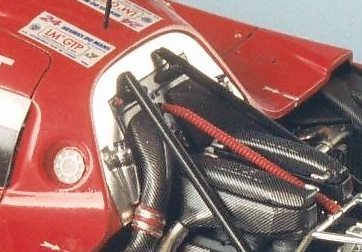
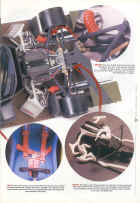
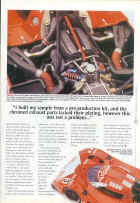
The oily bits Once the chassis as covered I then assembled the engine. I had very little reference for this so I decided to build it from the box, just adding carbon decal were appropriate (where the instructions say " X-18"), and detail painted the parts. Tamiya, and Halfords paints were used along with Humbrol Metalcote paints to shade the engine block. All of the ducting was again covered with carbon decal - I cut thin strips of masking tape and laid these over each part to make a template, then transferred this to the decal sheet and cut the piece out. This did involve several attempts to get the sizing correct and some parts require several pieces of decal, but careful matching yields a neat result. Bare metal foil was used to form all of the retaining clips. The chrome parts had their sprue attachment points touched in with X-11 pen paint (most of these are out of sight, thanks Tamiya!) and I then airbrushed Tamiya clear onto the exhausts and turbo to represent heat staining. To add contrast I sprayed the suspension wishbones Halfords matt black. The remaining parts were paint as per the instructions.
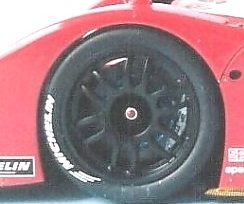
Interior This is one area that you can 'skip' on if you wish to save time, as most of the interior features are hard to determine once the car is assembled. However, yes you've guessed, I decided to plaster the interior with carbon as well! The firewall is provided for in the Scale Motorsports template kit, as are the door panels. The dashboard was also covered with carbon fibre decal, which really enhanced its appearance. Just as shame you can't see any of it! I sprayed the seat with a light blue mix given in the instructions and used the Studio 27 belt buckles to finish it all off. The exterior of the tub was covered with carbon fibre and carbon Kevlar decal, which looks superb once the car was completed. This is again provided via the template kit in several accurately sized pieces. Wheels
Final Assembly The car was coming together now and the nerve racking final assembly was nearing. The rear wing and end plates were covered with carbon fibre, and various parts of the body also. The small winglets on the front corners had 1/20th carbon sheet added for contrast. It was at this stage that I added the Studio 27 etched parts. I decided to leave off the radiator grilles as I thought the finish on the Tamiya parts looked better. In addition I left off the disc brake overlays, again I felt the Tamiya parts looked great once finished. All the other parts were used, the windscreen wiper and side number plate illuminants are particularly good. Once the main parts were glue together \I then added the tiny etched fasteners. I used .014" ones from Replica and Miniatures Co of Maryland. These are very difficult to handle. I did a few at a time, removing four or five from the backing sheet, carefully sliding these onto the model, then applying drops of epoxy glue into the indentations made earlier, and then maneuvering the etch part into position. Was it worth the effort? You decide. I think so! Once the decals were applied, again using photos from Le Mans, the model was finished. Summary Tamiya's catalogue of sports cars has always been excellent and the Toyota GT One kit is first class. Out of the box it builds into a fantastic replica but adding the carbon decals is well worth the time and effort, as is the enhancing Studio 27 etched kit. Of course the kit is a great base from which to do a conversion of the 1998 car that had that wild paint scheme. I prefer the 1999 car, but which ever you like, buy it and build it!
Thank You's! The Oracle, Dan Parratt for his unerring advice on the decals. Nick Picken at Marshal Auto Model Supplies for always having the aftermarket parts in stock! My partner Lynne for the use of her hairdryer!
|
|||||||||||||||||||||||||||||||||||||||||||