|
|
|||||||||||||||||||||||||
|
Cars |
|
||||||||||||||||||||||||
|
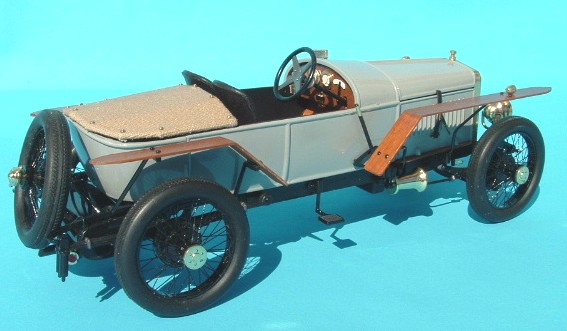
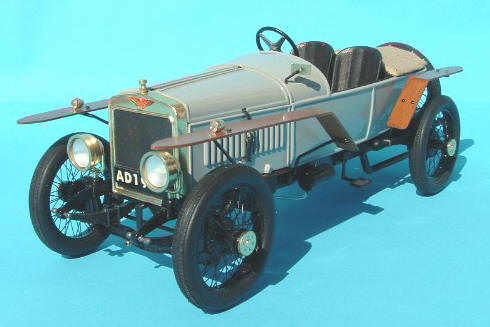
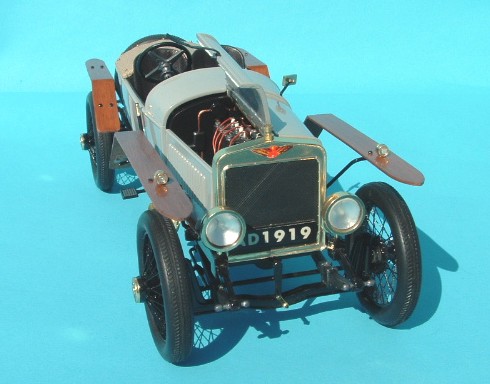
Hispano Suiza Type 15T ‘The Alfonso’ 1919 Gakken 1/16 scale |
|||||||||||||||||||||||||
|
by Martin Swire © 2005 Modeler Site |
|||||||||||||||||||||||||
|
Legal Notice No material from Modeler Site any Web site owned, operated, licensed, or controlled by Damian Covalski may be copied, reproduced, republished, uploaded, posted, transmitted, or distributed in any way, except that you may download one copy of the materials on any single computer for your personal, non-commercial home use only, provided you keep intact all copyright and other proprietary notices. Modification of the materials or use of the materials for any other purpose is a violation of Damian Covalski's copyright and other proprietary rights. Read More here > Legal notice The Alfonso is widely recognized by Motoring Historians as being the world’s first real sports car. Designed by Marc Birkigt, a Swiss citizen (as were all Hispanos) and financed in Spain, hence the name - Spanish-Swiss (Hispano Suiza), the Type 15T was originally a racing machine built to contest the 1910 Coupe des Voiturettes. After successfully winning this race the car was released as a production sports version, in 1914 production was eventually switched to a new factory outside Paris at Bois- Colombes. In 1912 Queen Ena of Spain gave a Type 15T to her husband King Alfonso XIII as a birthday present, and to celebrate the event the car was re-named The Alfonso. (The young King was a Hispano Suiza enthusiast and owned 30 of the companies models).
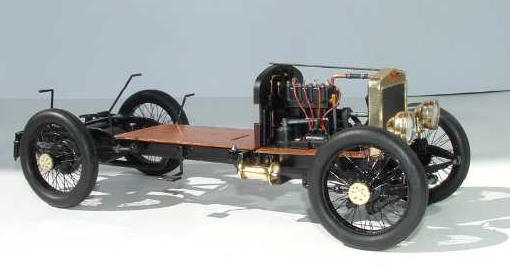
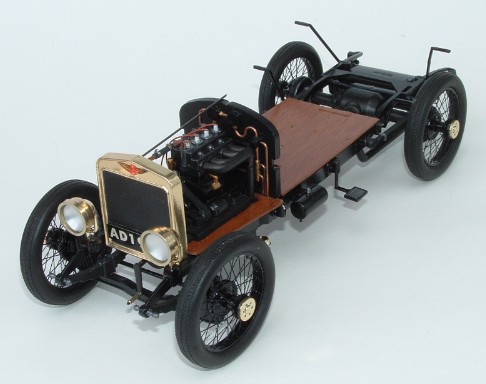
The Type 15T was powered by a 3.6 litre 4 cylinder motor which developed 64 bhp at 2300 rpm and gave it a top speed of 135 kph (about 67 mph!). Only 16 years previously - in 1894, the first recorded motor race was won at a speed of 11.4mph - and we think we have made progress! Considering it’s crude suspension and steering, and braking by drums to the rear only, it must have been a frightening device to drive fast on the unmade roads of France and Spain prior to and after the Great War. Photographs of the car give little idea of it’s size, but the 1/16 scale gives us some clues, and also some idea of Birgkit’s design ideas. Although it may appear, at first sight, typically ‘sit up and beg’ as we would expect, it is in fact a small car, being little longer than an MG TC of thirty years later. In modern terms it is only about the same length as a Mazda MX5!!! Little wonder then, with 3.6 litres on tap that it was successful! The kit and build
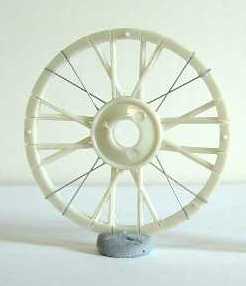
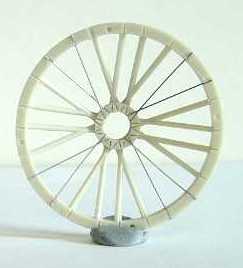
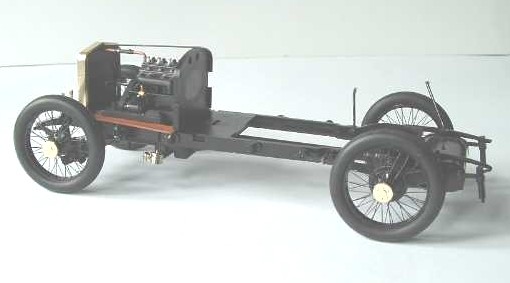
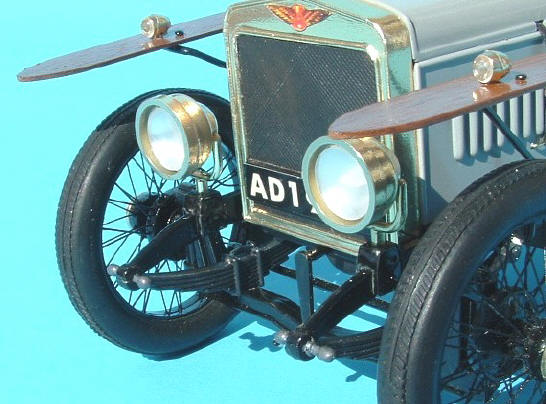
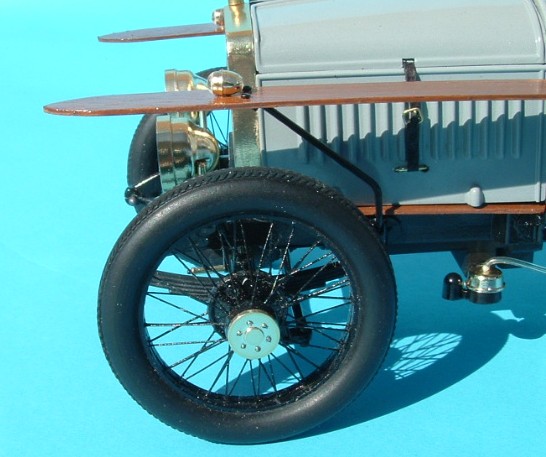
I wanted the model to look as realistic as possible and decided to try building the kit using as many ‘original’ materials as I could and hopefully come up with something which did not look as if it had been just pushed off a trailer at a Concours event. Converting the wheels Even before the kit arrived I had decided that I was going to have a go at converting the wheels to wire spokes, although, until I had it in my hands, I didn’t really have a clue as to how I was to go about this. I started the build with the wheels so that if I came to grief with them I could discard the project and all that would be lost was the very reasonable Ebay purchase price. After successfully converting three wheels I gave in and started on the main build - the remaining two wheels were then built bit by bit as I went along.
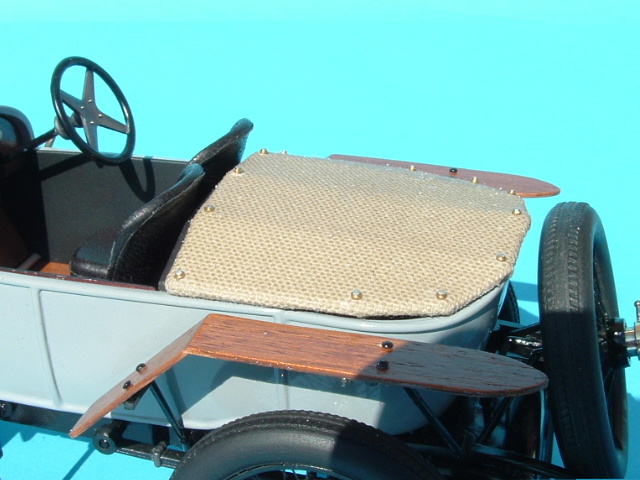
The wire used for the spokes came from sheets of twist ties provided in packets of freezer bags. These provided nice straight pieces of wire which were also just the correct width to fit tightly into the slot made by the saw blade. Slo-Zap CA glue was used to allow time to position the spokes. After spraying, the two halves were joined and any protruding spokes filed down. The tyres were very solid and a tight fit - to make them more pliable the inside was slit and then hollowed out using a sharpened dental probe to remove excess rubber.
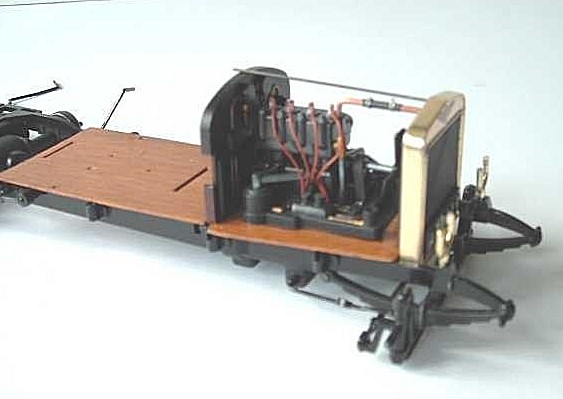
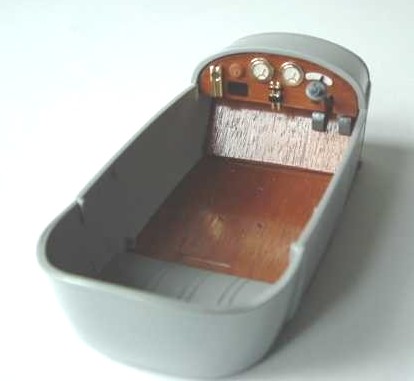
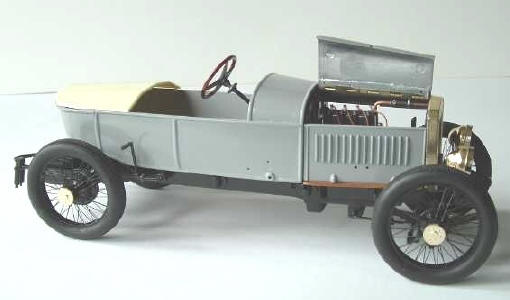
The third picture shows the final result in comparison to the original. Time taken for each wheel about 3 hours. For the floor, dashboard, engine base and the mudguards I used 1/32 mahogany sheet. The seats were covered with leather by Renaissance (available from Mediamix Hobby) and the tonneau cover was made from canvas. Much of the brasswork was replaced with Bare Metal Foil, although where possible it was only used to repair sprue damage. Fortunately the foil matched the brass colour coating exactly so this shortcut saved a lot of extra work. In the case of the radiator, the whole shell was stripped and foiled - this was simplified by cutting off the plastic water filler and replacing it later with a scratchbuilt part made from brass. The bonnet (hood) top was converted to take a piano hinge to enable it to open realistically, and leather straps were made to replace the plastic pieces on the bonnet sides; the buckles (3mm wide) were made from brass wire
which was closed with solder (I would not recommend this unless you want to go slightly crazy in the process!
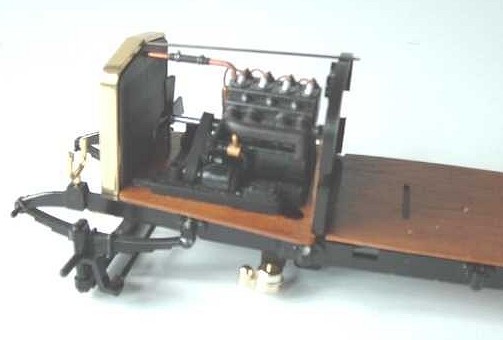
The build is relatively simple, starting with the chassis onto which is bonded the engine base plate and then the main block followed by the sump and gearbox. Rather than have a highly polished chassis I wanted to try and reproduce the kind of stove enamel finish which typifies cars of this period and so I applied gloss straight over a sanding primer which gives a slightly rough finish. Other items such as the petrol and oil tank were sprayed gloss black and polished as usual.
The slab-sided body is built up in separate pieces. The recommended method is to build back from the radiator by gluing the bonnet side pieces, the body sides and the rear section onto the floor and then adding the cowl. It became apparent in dry fitting that the sides and rear would not fit properly using this method; it was also going to be difficult to get a decent fit between the cowl and the sides. By using the original plastic floor as a template and cutting another two templates from card to represent the firewall and the rear bulkhead behind the seats, I found that I could make up an accurate jig upon which to construct the body. Using this method also gave the advantage that the whole tub could be sprayed as a unit. In the final build I went a step further by completely fitting out the body, adding a couple of interior side panels from
styrene sheet, and fitting it directly onto the chassis. In order to align and fit the tub correctly the original locating tabs were transferred from the plastic parts to the new wood floor (this same method, of paring off small parts with the razor saw, was also used to take off and the replace the small details on the dashboard).
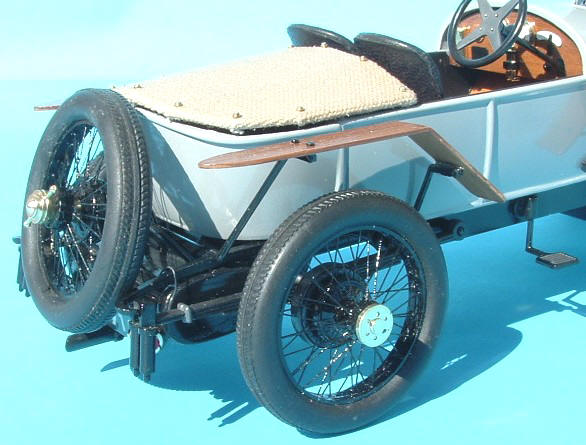
I must admit to being a fiddler when it comes to modelling. I like to see how things are ‘going to look’ and so tend to jump steps. In this case my ‘forward planning’ paid dividends when I tried to dry fit the mudguard supports to see what my ‘new’ wooden mudguards were going to look like on the chassis. Although this is the last step in the instructions, the forward rear mudguard supports would not fit into the brackets with the body in place. Further investigation showed that the supports for the front mudguards, which were badly bent on the sprue, would not allow the mudguards to sit at the same height. As I was now coming to the end of a somewhat lengthy build this was a bit of a set back and meant that there seemed to be no other option but to scratchbuild new supports. Like most things in modelling this seemingly simple task proved more difficult than I had imagined for this was definitely working in three dimensions and the straight looking supports soon took on a life of their own. Fortunately the box-art had excellent line drawings which clearly showed the comparative fit of the mudguards from front, rear, side and top views (did I say three dimensions?) which showed the mudguards to be horizontal and almost in line with the swathe line along the top of the bodywork. To make the job harder I had also added bolt heads on the mudguards, made from steel pins, which also had to line up with the supports. Oh well! - nothing venture....
I started making the supports from alloy rod but broke so many pieces, by continual bending, that I eventually resorted to plastic coated wire. This has the unfortunate disadvantage that gripping with any sort of pliers distorts the plastic coating, but it is strong and problems can be rectified later with a little sanding and filling before painting. This was my first try at 1/16 scale, which I must admit is a scale that I had never given much thought. The resulting model size is pleasing - not too large, not too small. I like it and hope you do too - bring on more 1/16ths!
Support us ordering our notes in PDF > Here |
|||||||||||||||||||||||||