|
Legal Notice
No material from Modeler Site any Web site owned, operated, licensed, or controlled by Damian Covalski may be copied, reproduced, republished, uploaded, posted, transmitted, or distributed in any way, except that you may download one copy of the materials on any single computer for your personal, non-commercial home use only, provided you keep intact all copyright and other proprietary notices. Modification of the materials or use of the materials for any other purpose is a violation of Damian Covalski's copyright and other proprietary rights.
Read More here > Legal notice
Painting figure faces is probably the task that complicates modelers the most. Though it is true that faces not properly painted, with blurred eyes and no contrasts are doomed to step unnoticeably into our collection, it is also true that this aspect will particularly call the eye of the figure category judges. Thus, it is a point where more attention should be focused on when building our models. As a friend of mine says, "our hobby consists essentially in bringing a series of dead parts to life and this is mainly achieved by applying color naturally; if not, no matter how well the figure may have been manufactured, it will still be dead unless properly painted."
In order to overcome this dilemma, there are a number of methods suitable for each kind of paint used. The system I will explain is based on acrylics, the use of which is slightly different from enamels and oils. As time goes by and practice is increased, we can surely mix these different techniques very naturally. In my opinion, this is the simplest method for those who are starting as modelers.
The material
To paint faces we need a 0 and a 1 brush. I use Ocean's -the brown ones- and the Cotman series of Windsor & Newton's -the light blue ones. It is better not to get used to very small brushes (00, 000 and 0000) since they are very expensive, they bend easily and their use is very limited. I prefer to use brushes with longer hair, which will make highlighting easier. We will also need a white cloth with no fluff -ideally cotton. Never use toilet or tissue paper. Finally, a small vessel with clean water is also needed along with the paints, of course.
STEP 1
|
|
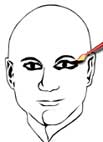
The first step after sandpapering the figure and applying filler is preparing it. I recommend either to spray white or light grey enamel or to apply it with a brush. The surface should be soft without any bubbles. Once this is finished, we start by painting the face. The first thing to do is to paint a mask around the eyes with dark coffee brown or black, no matter how thick it may result. The only thing that should be avoided is staining the eye-ball. Afterwards, we have to draw a perpendicular line on the centre of the eye. It is important to check that the line, which will be the pupil, touches both eyelashes.
|
STEP 2
|

|
Once the mask is dry, we have to prepare de basic color. I use the following mixture: Bronzed Flesh (Citadel), Bestial Brown (Citadel), dark coffee brown (Life color) and some dark green. The amount of each colour will depend on the face we want to paint. This means that a European will have a brighter skin than an Arab, for which reason the amount of coffee brown will be smaller. We paint the whole face with this mixture and with the 0 brush we start to reduce the mask until the lower eyelashes are slightly perceptible and the upper are very thin.
|
The colours I mention are just a reference. If they are not available, you may replace them by Vallejo paints though simply checking the color equivalence.
STEP 3
|

|
We start in this step to illuminate the face by making the paint lighter. To the base colour we should add small quantities of bronzed flesh and clean water until the mixture on the palette acquires the consistency of milk. Under no circumstances should we allow our mixture to dry; we should work with generous amounts of paint and remove the excess from the brush by rubbing it gently on the cloth. This should be applied on all upper parts of the face: cheeks, nose, chin, ears, and upper lip. The first lighter tone obtained should cover the entire face and be almost imperceptible.
|
This should be repeated, though gradually adding lighter colour until pure bronzed flesh is reached. However, this should not be achieved in less than five additions of lighter colour paint.
STEP 4
|

|
Once the first step of illumination is finished, the lighter ones should be done by adding clear skin -Elf Flesh by Citadel or clear skin by Life color- to the bronzed flesh. This must also be done gradually, remembering to remove the excess of paint on the cloth. Be reminded that the dry brush is almost never used when working with acrylic. After the paint has been lightened by four tones, we should obtain a pure light colour. It is important to apply it just on the cheeks, the nose and the chin. Then, very carefully, we add a little -and I mean very little- white to give it the final illumination.
|
We should be very sensible when illuminating; for instance, if the figure is wearing a helmet, the forehead should not be the most illuminated part.
STEP 5
|

|
The step following the illumination is to work with the shadows. For this I use Citadel's Bestial Brown, applied as a glaze on every lower part of the face, in particular on the eyelids, sides of the nose, below the cheeks and neck. The glaze is obtained by diluting the paint to an extent similar to washes. Vallejo and Citadel market special paints for this purpose. However, I prefer to prepare them myself. Allow me to be repetitive: be reminded to remove the excess of paint from the brush on the cloth.
|
These washes or glazes are done with a # 1 brush. The idea behind it is to obtain natural shadows but if we exaggerate them, the face will only look dirty.
STEP 6
|

|
To finish the work, we will apply the deepest shadows. To this end, we shall add very dark coffee brown and, those who are more daring, even some black, to the washes we already have. With the paint under the form of a glaze, we shall highlight eyebrows, ears and in general, the deepest wrinkles our face may have. We can also highlight the union of the neck with the shirt. The deepest shadows should be applied very carefully, trying the merged color not to look like stripes. The less daring modelers who have had a good performance up to now may do away with them and leave them for some time in the future.
|
Finally, we shall paint the lips with a glaze of vermillion mixed with bronzed flesh. Be reminded that unless it were a lady, the lips are never red or pink. Then, we draw an almost invisible line to separate the lips. The eyebrows may be painted with dark coffee brown dark grey; black should be avoided.
Conclusion
To close the article it should be noted that this is a general light method. Directed or zenithal light will be dealt with some other time. Also, be reminded that it is practice that makes a master; so, do not be afraid of experimenting since it is the only way to make progress. If this system does not work for someone, he should be patient and keep on trying.
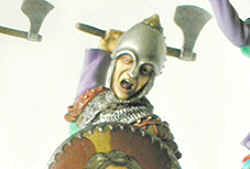
Samples of faces which were painted using the explained technique.
Support us ordering our notes in PDF > Here
|