|
|
|||||||||||||||||||
|
Airplanes |
 |
||||||||||||||||||
|
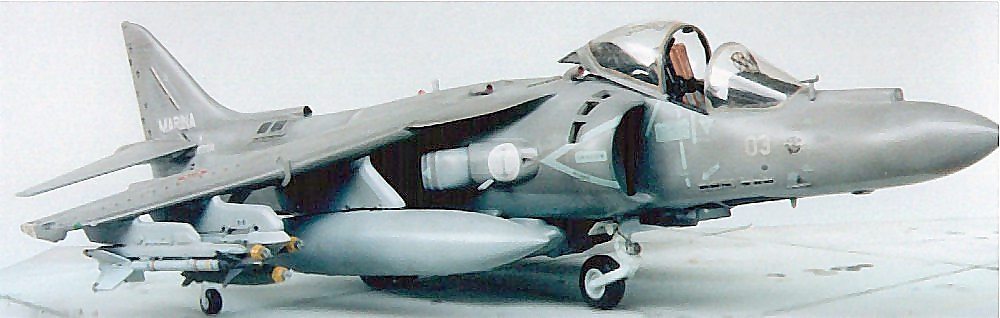
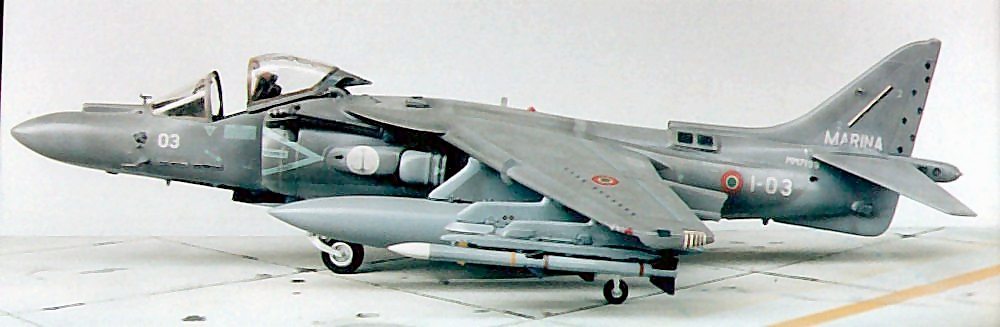
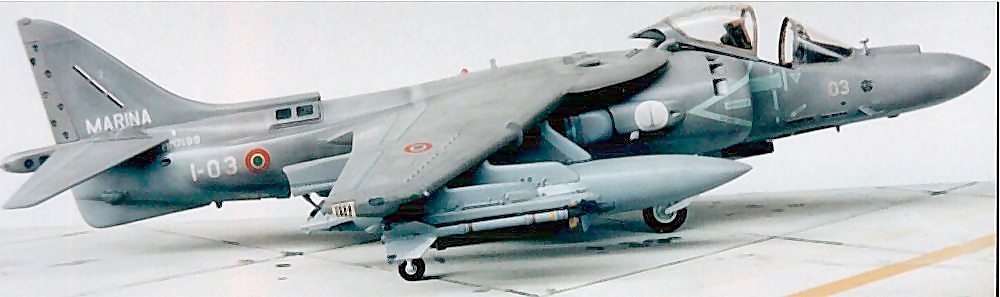
An Italian Harrier - AV-8B Plus conversion in 1/48 |
|||||||||||||||||||
|
by Giovanni Galvan |
|||||||||||||||||||
|
In this scale you only have two choices, Monogram and Revell. We bought the latter because the first seems to be too simple, although it comes with the bulged chaff/flares launchers on the back. However, it is interesting to notice that the Revell kit remained only one year in the catalogue! The Monogram version is not easily found in Italy, but it still remains as the better choice for us, given the outstanding detail level.
Two years later, the Italian firm EP Models (now missing too) made the entire resin conversion set; we believe that the set based just on this article. Now it seems it will be re-released by another firm, some rumors on the web indicate so.
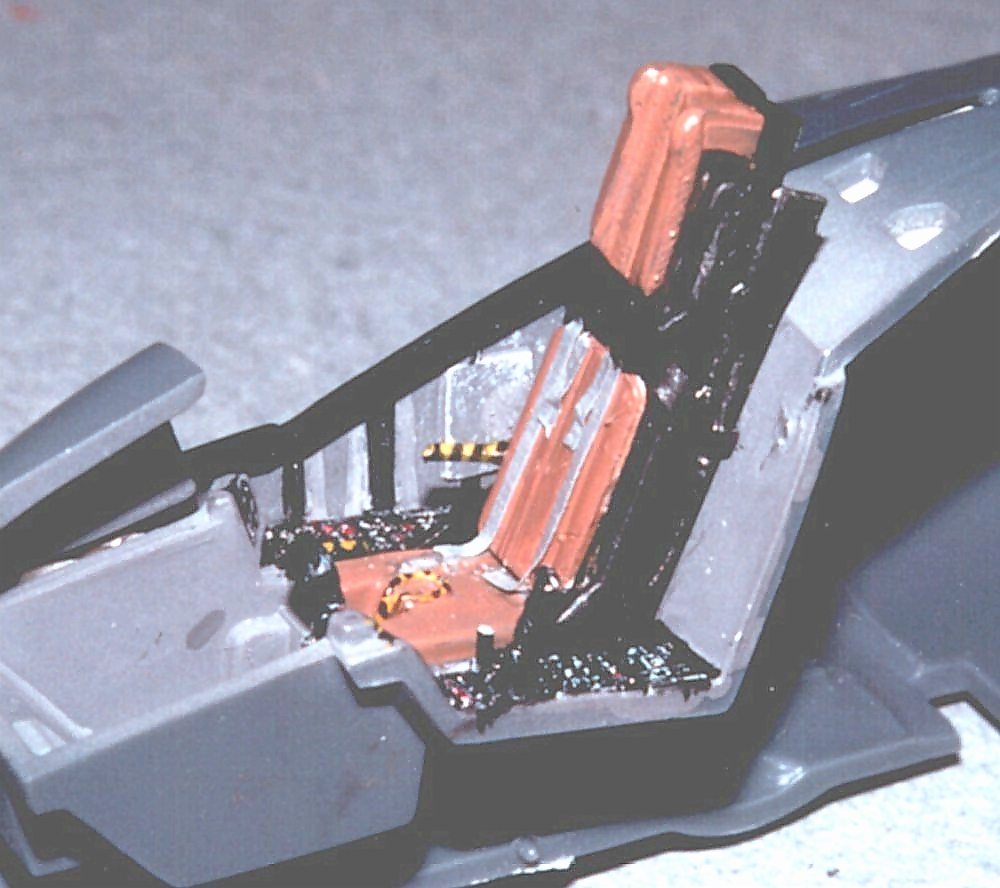
Main modifications We have already told that the Monogram kit, although having all the raised paneling, has an excellent detail level, especially concerning buggies and inside detailing. In fact the Eduard photo-etch sheet #.48-046 was only partially used, because the instrument panels, the original seat as well as the consoles, are more than acceptable. That is why the excellent PD Model seat, remained in its envelope.
The Eduard sheet furnishes the interiors of the empty ventral air brake, which for us are optional, given the good detail of the pieces of the kit and the insufficient visibility of the part, specially if the ventral gun is mounted. However, a counsel: leave the frames of the anti collision strips, the original ones are a lot better!
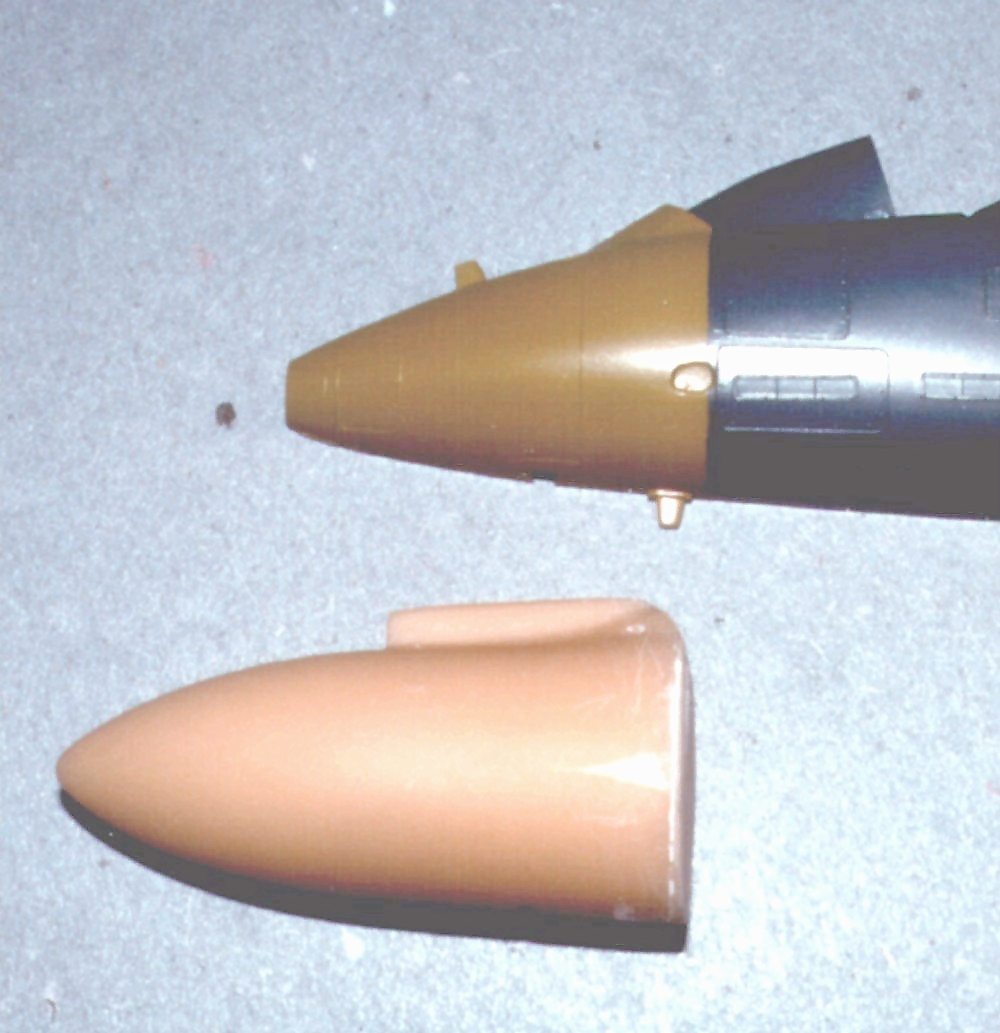
Once we closed the half fuselages we clipped the nose according to the instructions of PD Model, cutting a curve in front of the windscreen along the base and going on vertically towards the lower part, departing from the corner between this base and the right. After taking good measures, we started cutting pieces with a cutting wheel, leaving some material for sanding and adjusting. The resin nose fitted well enough, even with the small plasticard disk that we've added in order to improve the adherence and close the gap left after the cutting operation. For the filling at the base of the windscreen, we used Kristal Klear and masked with adhesive tape. There was a small hole at the base of the windscreen, probably an air scoop, well noticeable on the photos. No weight was added because, once in a while, the model it's standing by itself!
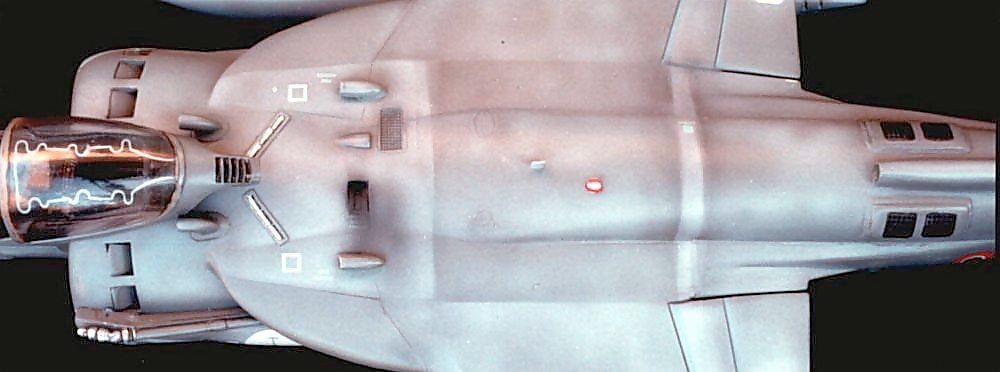
Once the fuselage halves were assembled, we made another cut at the base of the fin, and the original small air intake was moved 20 mm more ahead, and the gap among it and the fin was filled with plasticard. Around 2 more mm ahead of the air intake, begin the rounded bulges of the dorsal launchers, done with a smoothed rectangle (about 17 x 7 mm) of plasticard adapted with glue to the curved surface, on which another smaller rectangle has been superposed (1 mm minus per side), although 1,5 mm thick. The holes for the same launchers have been brought again on of the quadrates of Dark Grey painted decal, using the airbrush with Matt Black and using the Eduard photo etches for the ventral launchers as a mask.
There in no doubt about the thickness of these fins, because they have the same of the wing, while the old AV-8B had two thin riveted plates, these ones have a fairing also with the lower part, done with an abundant filling finished with the sanding paper wrapped around the handle of a brush to operate easily in that narrow slot.
The main modifications end with the addition of the four dorsal air intakes with a new shape, almost maritime. These were taken and adapted from the noses of four rockets of a Skyraider in 1/72 scale, cut and dug in the interior with a drill. The bases and the fairing for the two antecedent were done with plasticard and plaster. Other launchers, of semi-oval shape, were made with brass sheet, under the tail planes, with the flat part towards the back, and two small airscoops, always in brass, were added on to the back of the fuselage, corresponding with the two bows in the back part of the canopy. Finishing From this point on, the rest went on smoothly, with the exception of the fairing for the wing gears, which didn't fit well with the wing, and forced to great amount of filling and sanding. The same gears were shortened around 1,5 mm in the damper leg, in order to line them up with the rear landing gear, otherwise it would have remained slightly lifted from the ground. Instead, this gave the correct "sat" appearance for the aircraft, from the landing gear, confirming the excellent fame of this American company for the care they put in the ground attitude of their models.
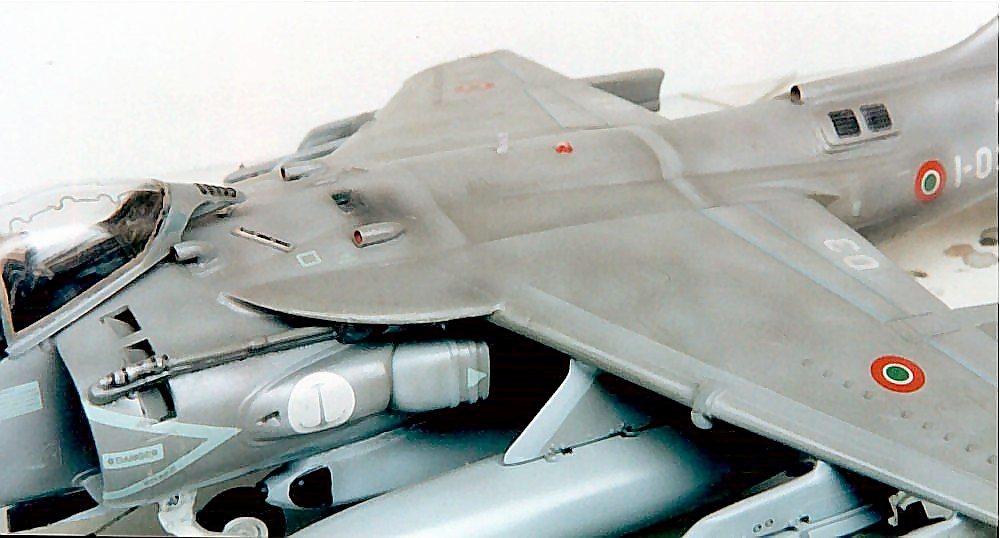
Concerning other finishing details, I sanded away the explosive strip in the canopy, raised in the external surface, polished it with 1000 wet sanding paper and abrasive paste, and replaced it with the same part in the Eduard set. We also took the small mirrors from the Eduard sheet, although we didn't use the frames, because they were too complex to be fixed. The dorsal light was eliminated and replaced with one moved to the left, done with a shaped piece of transparent sprue. Two blade antennas were added, one dorsal and one small under the nose, plus a probe on the left side of the nose, done with sprue. In the lower part, the part in the PD Model has an ugly hole for the pitch control, we replaced it with a thin piece of plasticard. Color scheme Quite a lot of decisions were necessary for the color scheme and the insignias. The scheme is the usual Dark Gull Gray 36231 for the upper surfaces and Light Gray 36320 for the undersurface, but for the single seat version the wheel wells for the air brakes are painted in ventral Grey, instead of White, and the main landing gear oleos are natural metal, instead of White.
The main corrections were made in the decals, drawn from the Tauro Model n.48-544 sheet, that offers a big amount of stencils, but lacks some of the insignias for the one seater. At first sight the roundels have the White circle reduced and not in proportion with the others two colors, which must be taken from the Tauro n.48-553 sheet, which is dedicated to the Italian Tornado on the Gulf, while the individual codes, the script "NAVY" and the badge with the anchor, are in White, good for the two-seaters, although they should be Light Grey (36440). So we airbrushed a light coat of 36231 Grey over these insignia.
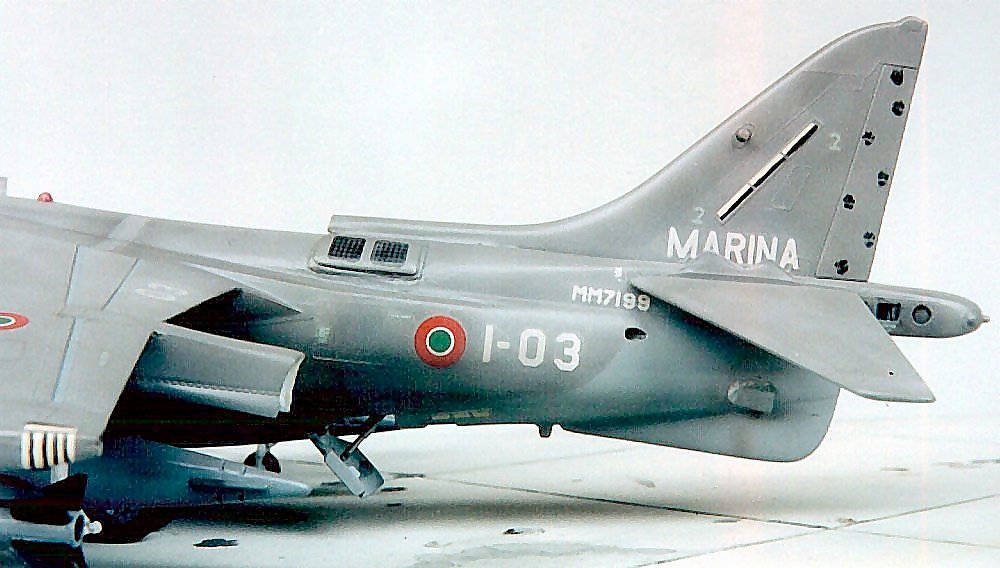
The presence of so many stencils, like those under the cockpit and the strips for the air intakes, are correct in Gray Blue 35352. The example we choose, which we met in 1995 aboard the Italian carrier "Garibaldi", is the MM 7199 code 1-03, the first one seater delivered. At that time it had a "false canopy" in Black under the nose, while during the mission in Somalia the "Wolf's steps" were added to the rudder (seven per side, with the highest leaving four scratches of the famous "Wolf" symbol of the 1st Grupaer (Air Group) of the Italian Navy). At the following Le Bourget Air Show, we saw the same example displaying the head of the Wolf surrounded by a Navy chord under the windscreen. We designed the steps and the Wolf's head (diameter around 3,5 mm) with a marker.
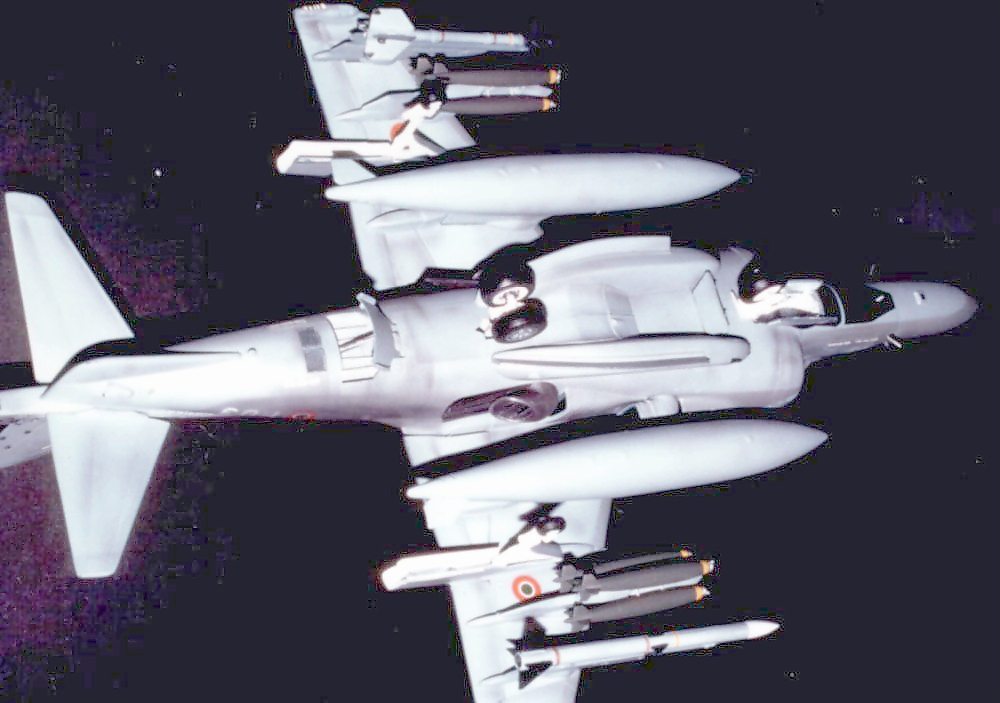
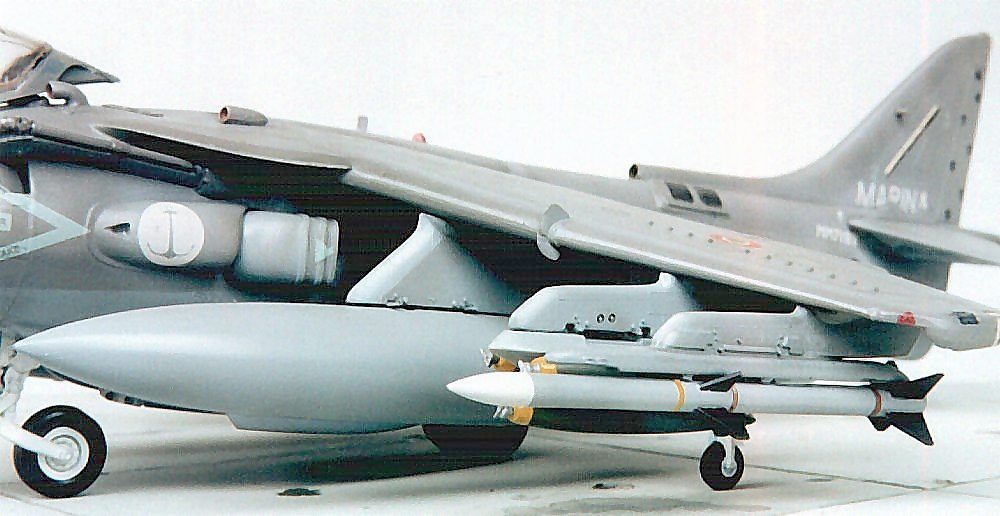
The ordnance we chose were "operational" and they included the ventral pods for the 25 mm gun with its cartridge, two additional fuel tanks, two TER pylons for six Mk.82 (from Weapon Set Hasegawa), a Sidewinder included with the kit, and an AIM-120B AMRAAM, from the F-16C block 40 Hasegawa kit.
Support us ordering our notes in PDF > Here |
|||||||||||||||||||