|
Well, here we go with another painting technique. For the last 15 years, I’ve heard of many different ways of painting a plastic body, this why I think there are as many techniques as model builders. I’ve received lots of messages asking me to explain mine, which works ok for me but could not be useful for others.
Ten years ago we didn’t dream of Internet, even more in my country, the materials offered was less than nowadays and there weren’t ( materials ) available out of the countries they were manufactured. For example I tell you, I couldn’t get #2200 sandpaper not even 10000.
Getting a finish free of dirt, orange peel and with deep shine, was a dream, an utopia.
On those times, I used Testor can paints, the finish showed orange peel and hadn’t shine most of the times.
I had read about paint techniques based in spary cans, but they worked only for small bodies.
There wasn’t other chance than softly sand the paint until achieving a matt surface without faults and then give the finish with a polish compound. Today this paint method is used with best results by most of car modelers. I admit that this method doesn't work very well for me with big scale kits (1/12, 1/8)
To get a deep shine you’ll have to varnish , then sand and polish it (with the risk of reaching the plastic surface).
If it is not an even surface, it’s impossible to get a smooth finish.. Besides, many F1 have their bodies distributed in different parts, which make the process more difficult.
Ten years ago, I began painting with Tamiya enamel, and I was astonished by its properties
Warming
the paint
After painting a metal part, I warm it in an oven, this temperature increase will cause paint to become soft and flatted; disappearing in this way the orange peel, even which is not evident, so an incredible shine is achieved. This is the reason why most of the modelers use to warm with a hair dryer the parts recently painted.
The
orange peel, the enemy
Remember that orange peel is the accumulation of small paint particles, which don’t get to form an even surface.
Spray paint in a well ventilated area only. It is important that you hold the spray can the correct distance from your model...about 6 inches is usually recommended. If you get it too close your paint job will have runs in it; too far away and your paint job will have an orange peel effect (it will look rough and dull). Keep the can moving while spraying...again, too much time spent in one spot will result in runs and a not-so-great paint job. Before you spray paint your first model, practice on an old cardboard box. Allow the first coat to dry for at least an hour and then apply a second coat
Turning again to the hair dryer use, this practice negative point is that all dirt in the air, pastes.
Then as we can’t warm the plastic parts we have to find a way which allows us a cold ironing of the paint layer.
I insist with the excellent properties of Tamiya’s enamel, it dries quickly but goes on working during days, achieving in this way the ironing effect. This is not enough to get a flawless finish and a deep shine.
|
|
|
|
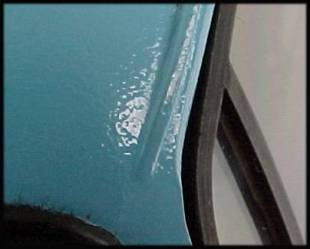
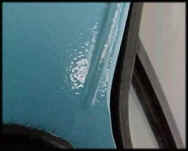
Surface with orange
peel
|
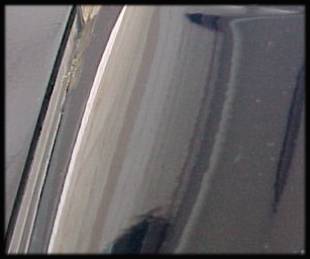
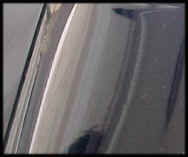
Very shine surface
|
So, after many
tests, I developed the following method
1) You must paint, if possible, in a place free of dust and fluff. Usually a well ventilated area.
I spray water all over the area and the painting box where I’ll work, besides I try not to wear clothes made of wool.
Plastic parts must be washed with soapy water, and must be allow to dry without being in touch with clothes and other fabrics. This usually is enough to avoid static charging and should be always done no matter which painting technique you choose.
2) Mix Tamiya’s paint, from a new bottle, with lacquer thinner (50/50) in a 25 °C room temperature approximately. (at least two hours before painting).
If room temperature is greater or least than 25°C, we must increase or decrease paint dilution.
3) I use a Badger 200 airbrush with big head ( for big scales), it must be very clean, with a new or very well washed bottle.
If room temperature is lees than 20°C we paint with 20 lbs pressure, if it is greater than 25°C we can decrease to 15 lbs.
The goal is to paint once and for all the body part, covering it well with several thin layers and a thick last one, without flows or orange peel. By testing and practicing it is possible to achieve the above mentioned.
The secret is in the last layer, it must be heavy and if we choose well the pressure and dilution, the paint will not run.
I want to clarify that all this work must be done at the same time and during no more than 5 minutes.
4) After making the above, we allow the body part rest in a place free of dust for 10 or 15 minutes, meanwhile, we paint other body parts or prepare the Tamiya varnish, which must be very diluted with lacquer thinner, as rule we can say that it should be diluted more than the painting..
5) After 15 minutes we apply several thick varnish layers.
I use a double action Badger 150 airbrush to achieve more control, without interrupting the paint flow.
Every time we paint with airbrush, it is necessary to begin outside the part area and also finish out, to avoid the abrupt changes of paint flow.
Conclusion
The object of all this is to allow that the lacquers thinner loosen the paint layers so they are ironed while they dry off. As the lacquer thinner dries very fast, it allows us giving many paint layers one after another without running.
As final result, if everything was fine, we achieve an intense shine surface with deep tonality because of the varnish layer.
If during the painting any dirt would have adhered , it is possible to sand with fine #1500 sandpaper and to give a very thin and diluted varnish layer, but thinned with Tamiya thinner X20, because once the enamel dries, is not advisable to paint with lacquers.
If we have to apply decals and we want to varnish them, we do it again with varnish diluted with Tamiya X20.
If we have to paint in two colours, first we apply the clearest, allowing it to dry for several days. Then we mask, apply the second colour, and 20 minutes later we remove the mask. Finally, we give a very thin varnish layer to seal the painting that is already dried and after a while we apply the thick varnish layer.
A last detail, once the paint is dry and the decals are placed, we apply Tamiya wax or another to enhance the shine.
|